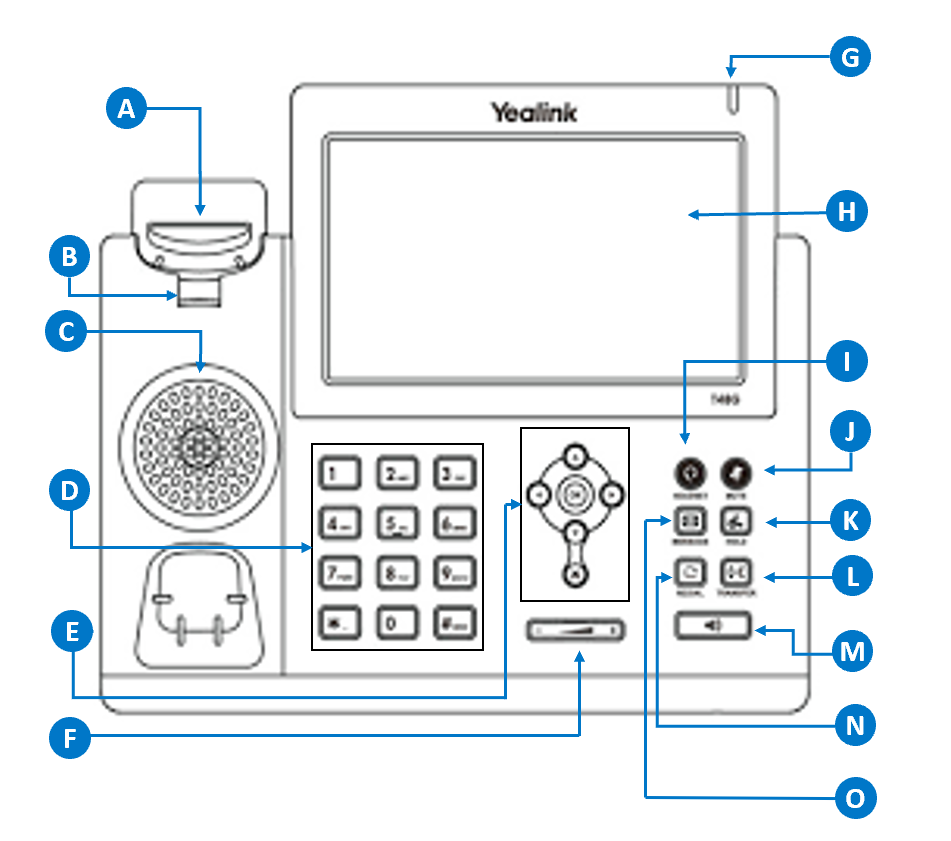
Skip to content Skip to main navigation Skip to footer

Yealink T48

Yealink T48

A. Hookswitch

Picking up the handset from the handset cradle, the hookswitch bounces and the phone connects to the line, laying the handset down on the handset cradle, the phone disconnects from the line.

B. Hookswitch Tab

Secures the handset in the handset cradle when the IP phone is mounted vertically

C. Speaker

Provides ringer and hands-free (speakerphone) audio output

D. Keypad

Provides the digits, letters, and special characters in context-sensitive applications.

E. Additional Keys

  • Left and Right Arrow Keys:
    • Position the cursor within text you are updating.
    • Enable or disable fields.
  • Up and Down Arrow Keys:
    • Turn pages or scroll through values for a field
    • Scroll through items
    • Access to History and Directory respectively
  • OK button confirms action or answers calls.
  • X button cancels actions or rejects calls.

F. Volume

Adjusts the volume of the handset, headset, speakerphone and ringer.

G. Power Indicator LED

Indicates phone power and some feature statuses.

  • Receives an incoming call – fast flashing
  • Receives a voice mail or text message, slow flashing

H. Touch Screen

The screen is touch-sensitive. Tap to select and highlight screen items.

Shows information about calls, messages, soft keys, time, date, and other relevant data:

  • Call information – caller ID, call duration
  • Icons
  • Missed call text or second incoming caller information
  • Prompt text
  • Time and date

I. Headset Key

Toggles and indicates the headset mode

J. Mute Key

Toggle and indicates the mute feature.

K. Hold Key

Places a call on hold or resumes a held call.

L. Transfer Key

Transfers a call to another party.

M. Speakerphone Key

Toggles the hands-free speakerphone mode.

N. Redial

Redials a previously dialed number.

O. Message Key

Accesses the voice messaging system.


Basic Call Features

Placing a Call

  • Using the Handset:
    1. Pick up the handset
    2. Enter the number, and then press the Send soft key.
  • Using the Speakerphone:
    1. With the handset on-hook, press the speakerphone button.
    2. Enter the number, and then press the Send soft key.
  • Using the Headset:
    1. With the headset connected, press the Headset button to activate the headset mode.
    2. Enter the number, and then press the Send soft key.

Answering a Call

  • Using the Handset: Pick up the handset
  • Using the Speakerphone: Press the speakerphone button.
  • Using the Headset: Press the Headset button.

Ending a Call

  • Using the Handset: Hang up the handset or press the End Call soft key.
  • Using the speakerphone: Press the speakerphone button or the End Call soft key.
  • Using the headset: Press the End Call soft key.

Redial

Press the Redial button to the enter the placed call list, press the up or down arrow buttons to select the desired entry, and then press the Redial button or the Send soft key.

Call Mute and Un-mute

Press the Mute button to mute the microphone during a call. Press the Mute button to un-mute the call.

Call Hold and Resume

  • To place a call on hold: Press the Hold soft key during an active call.
  • To resume the call, do one of the following:
    1. If there is only one call on hold, press the Resume soft key.
    2. If there is more than one call on hold, press the up or down arrow buttons to select the desired call, and then press the Resume soft key.

Call Transfer

You can transfer a call in the following ways.

  • Blind Transfer
    1. Press the Transfer button or soft key during an active call.  The call is placed on hold.
    2. Enter the number you want to transfer to.
    3. Press the Transfer button or soft key.
  • Semi-Attended Transfer
    1. Press the Transfer button or soft key during an active call. The call is placed on hold.
    2. Enter the number you to transfer to, and then press the Send soft key.
    3. Press the Transfer button or soft key when you hear the ring-back tone.
  • Attended Transfer
    1. Press the Transfer button or soft key during an active call. The call is place on hold.
    2. Enter the number you want to transfer to, and then press the Send soft key.
    3. Press the Transfer button or soft key when the second party answers.

Call Forward

To enabled call forward:

  1. Press the Menu Icon when the phone is idle, and then select Features > Call Forward.
  2. Select the desired forward type:
    • Always Forward – Incoming calls are forwarded unconditionally.
    • Busy Forward – Incoming calls are forwarded when the phone is busy.
    • No Answered Forward – Incoming calls are forwarded if not answered after a period of time.
  3. Enter the number you want to forward to. For No Answer forward, press the right or left arrow buttons to select the desired ring time to wait before forwarding from the After Ring Time field.
  4. Press the Save soft key to accept the change.

Call Conference

  1. Press the Conf soft key during an active call.  The call is placed on hold.
  2. Enter the number of the second party, and then press the Send soft key.
  3. Press the Conf soft key again when the second party answers.  All parties are now joined in the conference.
  4. Press the End Call soft key to disconnect all parties.

Voice Message

Message waiting indicator on the idle screen indicates that one or more voice messages are waiting at the message center.  The power indicator LED slowly flashes red.

To access your voicemail box

  1. Tap the Voicemail Icon (if you have a message) at the top middle of phone and then tap the Connect soft key.  You can also press the Message button on the phone.
  2. Follow the voice prompts to listen to your messages, change PIN or record greeting. 

Yealink T42

A & J: Line Keys

Use these keys to activate lines and assign various features

B: Hookswitch

Picking up the handset from the handset cradle, the hookswitch bounces and the phone connects to the line, laying the handset down on th handset cradle, the phone disconnects from the line.

C: Hookswitch Tab

Secures the handset in the handset cradle when the IP phon is mounted vertically

D: Soft Keys

Label automatically to identify their context-sensitive features

E: Additional Keys

  • Arrow keys are used to scroll through the display information.
  • OK button confirms action or answers calls.
  • X button cancels actions or rejects calls.

F: Speaker

Provides hands-free (speakerphone) audio output

G: Keypad

Provides the digits, letters, and special characters in context-sensitive applications.

H. LCD Screen

Shows information about calls, messages, soft keys, time, date and other relevant data.

I. Power Indicator LED

Indicates phone power and some feature statuses.

  • Receives an incoming call – fast flashing
  • Receives a voice mail or text message, slow flashing

K. Mute

Toggles and indicates mute feature.

K. Headset

Toggles and indicates the headset mode.

K. Message

Accesses voice mails.

K. Redial

Redials a previously dialed number.

L. Speakerphone

Toggles and indicates the hands-free speakerphone mode.

M. Volume

Adjusts the volume of the handset, headset, speaker and ringer.


Basic Call Features

Placing a Call

Using the Handset:

  1. Pick up the handset.
  2. Enter the number, and then press the Send soft key.

Using the Speakerphone:

  1. With the handset on-hook, press the speakerphone button.
  2. Enter the number, and then press the Send soft key.

Using the Headset:

  1. With the headset connected, press the Headset button to activate the headset mode.
  2. Enter the number, and then press the Send soft key.

Answering a Call

Using the Handset: Pick up the handset.

Using the Speakerphone: Press the speakerphone button.

Using the Headset: Press the Headset button.

Ending a Call

Using the Handset: Hang up the handset or press the End Call soft key.

Using the speakerphone: Press the speakerphone button or the End Call soft key.

Using the headset: Press the End Call soft key.

Redial

Press the Redial button to the enter the placed call list, press the up or down arrow buttons to select the desired entry, and then press the Redial button or the Send soft key.

Call Mute and Unmute

Press the Mute button to mute the microphone during a call. Press the Mute button to un-mute the call.

Call Hold and Resume

To place a call on hold: Press the Hold soft key during an active call.

To resume the call, do one of the following:

  1. If there is only one call on hod, press the Resume soft key.
  2. If there is more than one call on hold, press the up or down arrow buttons to select the desired call, and then press the Resume soft key.

Call Transfer

You can transfer a call in the following ways:

  1. Blind Transfer
    1. Pres the Transfer soft key during an active call.  The call is placed on hold.
    2. Enter the number you want to transfer to.
    3. Press the B Trans soft key.
  2. Semi-Attended Transfer
    1. Press the Transfer soft key during an active call. The call is placed on hold.
    2. Enter the number you to transfer to, and then press the Send soft key.
    3. Press the Transfer soft key when you hear the ring-back tone.
  3. Attended Transfer
    1. Press the Transfer soft key during an active call. The call is place on hold.
    2. Enter the number you want to transfer to, and then press the Send soft key.
    3. Press the Transfer soft key when the second party answers.

Call Forward

To enabled call forward

  1. Press the Menu soft key when the phone is idle, and then select Features > Call Forward.
  2. Select the desired forward type:
    • Always Forward – Incoming calls are forwarded unconditionally.
    • Busy Forward – Incoming calls are forwarded when the phone is busy.
    • No Answered Forward – Incoming calls are forwarded if not answered after a period of time.
  3. Enter the number you want to forward to. For No Answer forward, press the right or left arrow buttons to select the desired ring time to wait before forwarding from the After Ring Time field.
  4. Press the Save soft key to accept the change.

Call Conference

  1. Press the Conf soft key during an active call.  The call is placed on hold.
  2. Enter the number of the second party, and then press the Send soft key.
  3. Press the Conf soft key again when the second party answers.  All parties are now joined in the conference.
  4. Press the End Call soft key to disconnect all parties.

Voice Message

Message waiting indicator on the idle screen indicates that one or more voice messages are waiting at the message center.  The power indiactor LED slowly flashes red.

To access your voicemail box

  1. Press the Message button or the Connect soft key.
  2. Follow the voice prompts to listen to your messages, change PIN or record greeting. 

Messaging Overview

nVX Chat allows users to stay connected and collaborate using files sharing, whiteboarding, task management, and more.

To navigate to the nVX Chat tool, select the chat icon, , from the left navigation panel. Once selected, the user will be redirected to nVX Chat page.

Starting New Conversations

Users are allowed to create new conversation, click on +New blue icon, . Following options are available:

  1. Invite New Client: A client invitation allows users to invite external parties
  2. Create New Project: A project should be created for collaboration amongst multiple users
  3. Create New Chat: A chat should be created for 1:1 collaboration

In-Chat Features

Following in-chat features are available for users:

  • Add file
  • Read-Unread message
  • Browser notification
  • Copy message
  • Create To-do
  • Edit message
  • Delete message
  • Chat members
  • Meeting from chat
  • Chat settings

Ending a Meeting

Meeting Participants

Meeting participants can Leave a meeting at anytime without impacting other Meeting attendees. To exit the meeting, participants can click the Leave icon at the top righ tof the meeting window. Participants will be prompted with a confirmation before leaving the meeting. Click the Cancel button to stay in the meeting. Click the Leave button to leave the meeting. After leaving a meeting, the browser will be closed and the user will be redirected back to the nVX User Portal.

Meeting Hosts

Unlike meeting participants, meeting hosts will impact all participants when exiting a meeting.

  • To end a meeting for all participants, Hosts can select the red End button located at the top right of the meetings window. Hosts will be prompted with a confirmation before ending the meeting. Click the Cancel button to stay in the meeting. click the End button to end the meeting for all participants.
  • To leave a meeting without ending it for all participants, the active Host will need to make a different meeting participant the new Host.

Manage Audio in Meetings

Meeting participants will be prompted with Join Audio options upon Joining a Meeting. However, participants can manage meeting Audio at anytime.

Joining Audio

To join audio after a meeting has begun, select the Join Audio icon from the top right of the Meetings window to open the dropdown selections.

  • Call Using Phone: Use an external device to dial-in to the conference bridge
    • If Phone is selected, dial-in incormation including dial-in country name, dial-in phone number, Meeting ID, and participant number will be provided. If multiple countries are available for your organization, the dial-in country can be changed, automatically adjusting the dial-in phone number.
  • Call Using Internet Audio: Use internet audio to connect to the conference bridge

Mute and Unmute Audio

After meeting audio has been joined, a Mute icon will be made available where the previous Join Audio icon was. To mute and unmute audio, click the Mute icon.

Manage Audio Options

Click the dropdown arrow next to the Mute/Unmute icon. From the dropdown, select Audio Options. An Audio Options window will appear. Select from the available Speakers and Microphones. This window will also provide a level test that audio is being captured correctly. After selecting the desired devices, click the X icon to exit the Audio Options window.

Leave Audio Mid-Meeting

Click the dropdown arrow next to the Mute/Unmute icon. From the dropdown, select Leave Audio.

Manage Video Capture in Meetings

All Meetings are video enabled. To turn on Video, select the Start Video icon on the top right of the Meetings window.

To manage the device capturing video, select the dropdown arrow next to the Stop Video icon and select Video Options. Available devices will appear in the Capture Video dropdown. After selecting the desired device, click Okay.

To stop video capture during a meeting, click the Stop Video icon located at the top right of the Meetings window.

Recording Meetings

Meeting recordings capture audio, video, screenshares, and file/whiteboard annotations. Recordings can be turned on multiple ways.

In a Meeting

Recording can be turned on at any point during an active Meeting by selecting the Recording icon at the top of the Meeting window.

Note: Only Host can see Start Recording button and record the meeting.

When Scheduling a Meeting

Meetings can be set to automatically record when the Meeting is scheduled.

Meeting Chat

All meeting participants can group chat in the same meeting. To open the group chat, selec the Participants icon at the top of the Meetings window. Group chat will be available on the bottom right of the screen. Participants can type into the text box marked by the placeholder ‘Send message..’. So send the message, press the Send icon, .

Manage Meeting Participants

Click on the Participants icon to see the list of conference participants. In the Participants pane, meeting Hosts can:

  • Change to a Participant to a Presenter or Host
  • Mute a single participant
  • Mute all participants

Collaborate on Files and Whiteboards in Meetings

Meeting participants can share and annotate files and whiteboards while in meetings.

Sharing Files

Participants can share Files directly within a meeting by clicking the Share File icon on the top of the meetings window. Select from the following:

  • Add files from Desktop: Select files stored locally on the desktop
  • Add files from Conversations: Select files stored in existing nVX messages

Creating Whiteboards

Participants can create whiteboards directly within a meeting by clicking the Share File icon on the top of the meetings window. Select Whiteboard from the dropdown. A new Whiteboard will be opened.

Annotating Files and Whiteboards

Participants can simultaneously annotate shared Files and Whiteboards using a variety of tools. All annotation tools are available from the bottom of the meetings window.

Navigate through shared Files and Whiteboards
Zoom In and Zoom Out
Make Files and Whiteboards Fullscreen
Undo Action
Redo Action
Draw
Highlight
Insert Text
Insert Arrows
Insert Rectangles
Identify specific areas of a File or Whiteboard using the laser pointer
Eraser (Note, participants cannot erase other participants annotations. Only their own.)
Turn on and off Annotation
Delete (Note, participants cannot delete other participants Files or Whiteboards. Only their own.)
Open color selector for annotations

Stop Sharing Files and Whiteboards

You can stop sharing Files and Whiteboards by:

  • Selecting the Share File icon and clicking Stop Sharing, , from the dropdown
  • Hovering over the File or Whiteboard being presented and selecting Stop Sharing