In the event of an emergency call, the system needs your location information and a callback number to provide this information to the 9-1-1 Operator. When you are working for a corporate location, your administrator may have already defined the location information to be used for Emergency Services. When you are working remote, you will be prompted to enter / validate your location.
Note: For User Portal users, the location information will only be required you are in Web mode
If location information identification fails, the domain’s default location will be used.
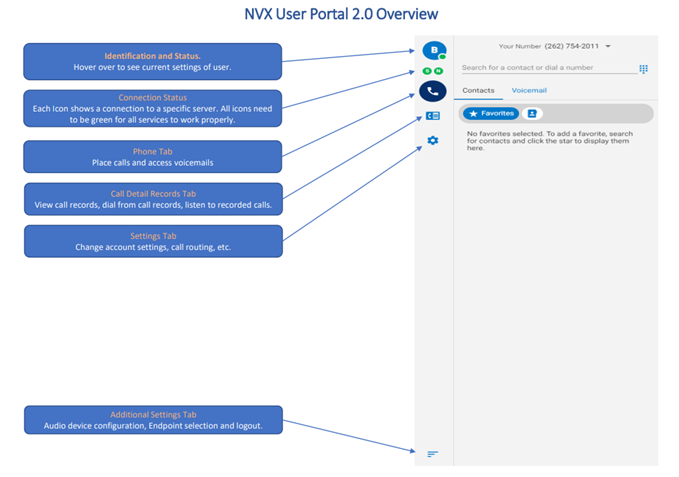
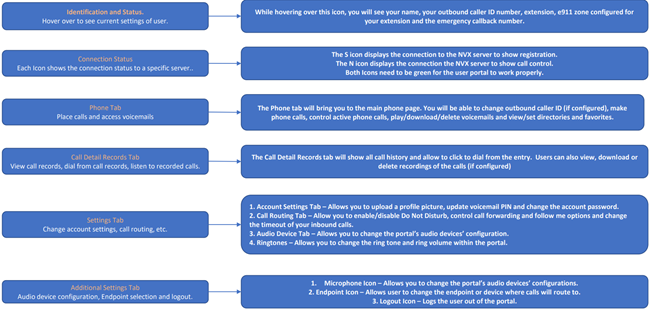
User Functionality
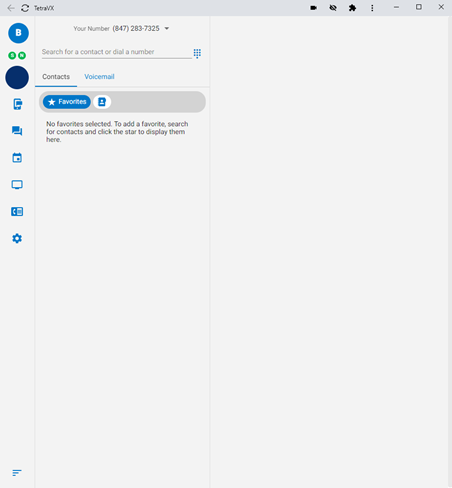
User Portal in Web Mode
When a User is in Web mode, they will be required to provide a “dispatchable” location for emergency services. A “dispatchable” location must be specific enough to allow emergency services personnel to easily reach the 9-1-1 caller.
The location can be a corporate defined network location, a previously created personal location or the user can create a new location.
Location Permission
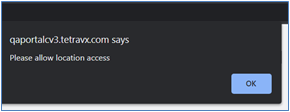
When the user logs into the User Portal and is in Web Mode, the user will be asked for permission to use device’s location.
The message indicates “Please allow location access”, click the OK button to allow.
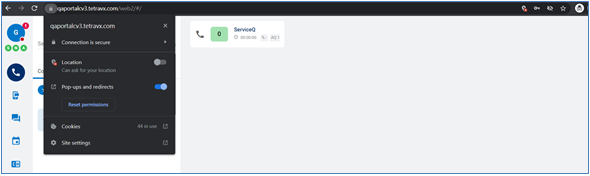
Click the lock icon before the URL to allow location sharing with browser the (Google Chrome)
Or, click on location with “x” toggle to allow location sharing with the browser (Google Chrome)
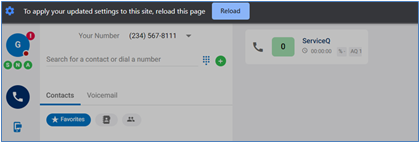
A browser refresh will be required to reload and apply settings.
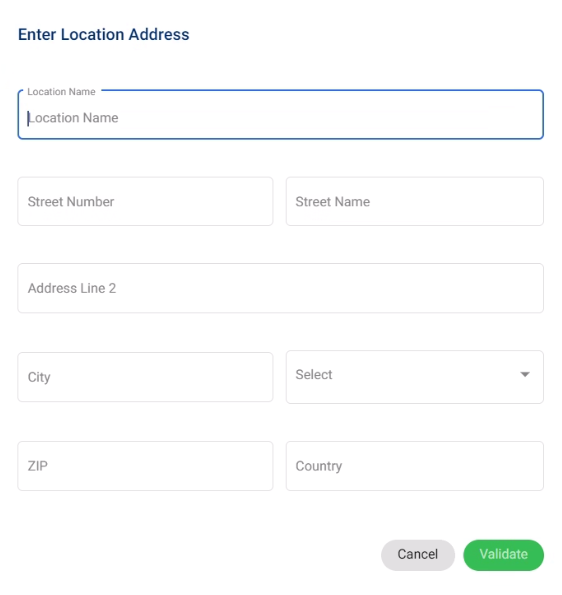
Create Location
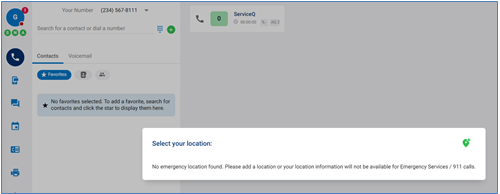
If no location is matched, the system will ask the user to create a new location. The message will indicate “No emergency location found. Please add a location or location information will not be available for Emergency Services / 911 calls.”
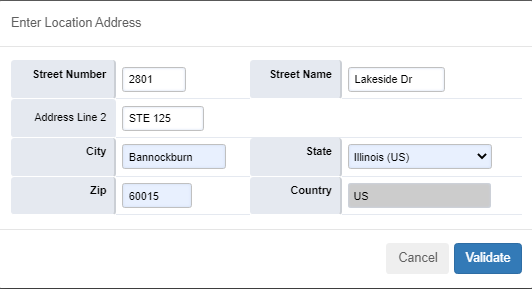
Click on ‘location with +’ icon and fill the following form to create a new location.
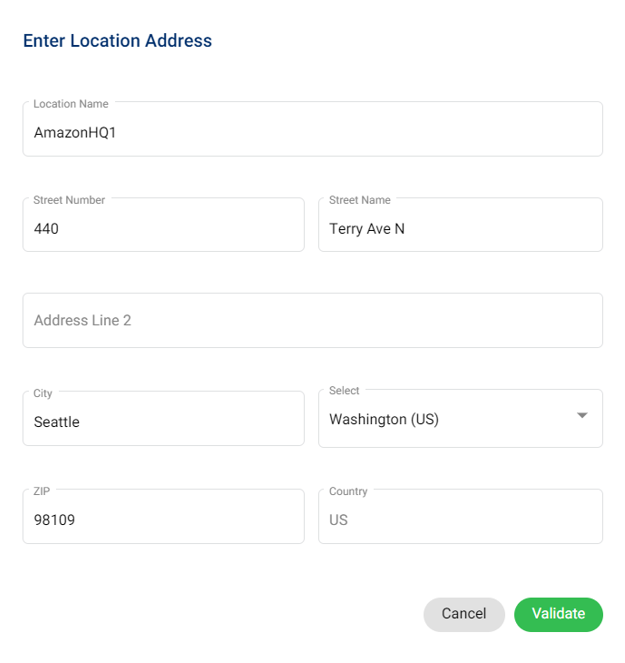
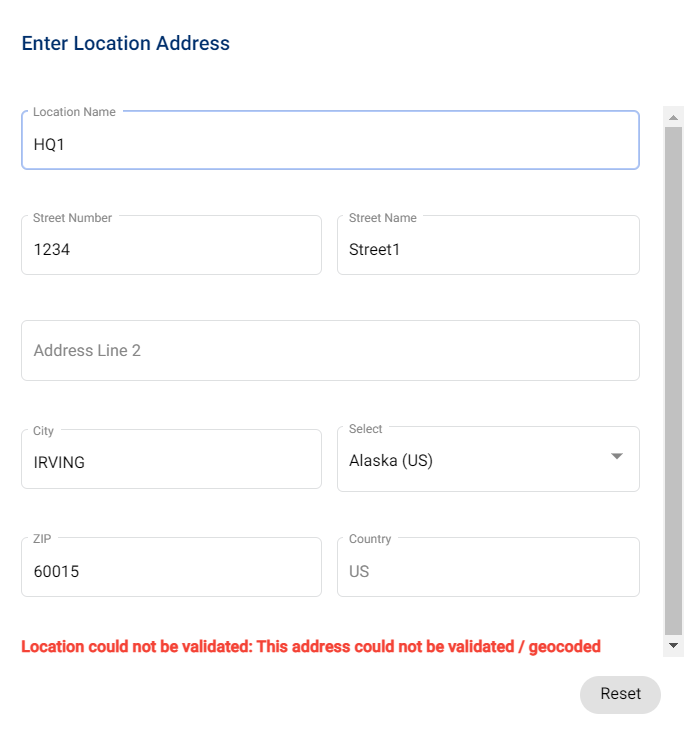
Enter the details: Location Name, Street Number, Street Name, City, State, ZIP and Country.
Click the “Validate” button to Validate the entered address or click “Cancel” to cancel creating location.
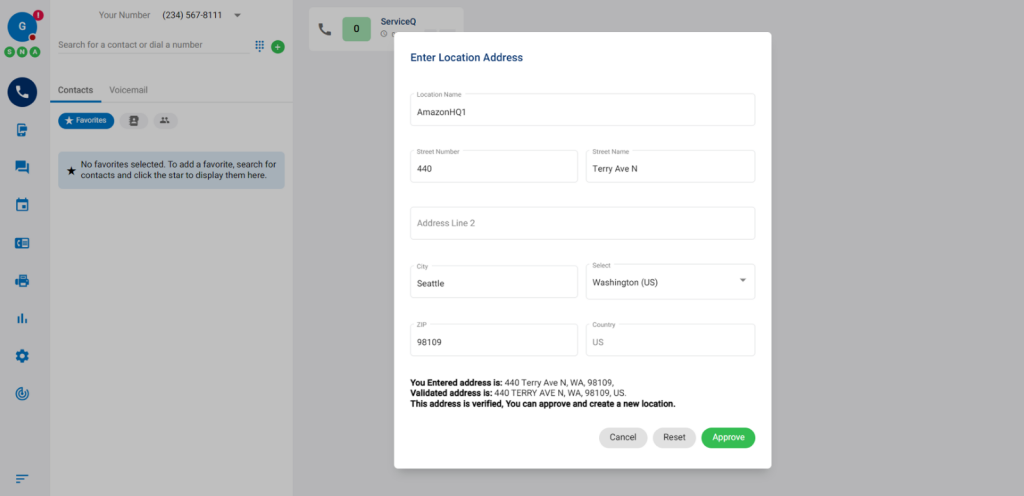
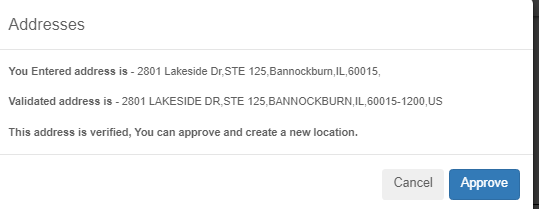
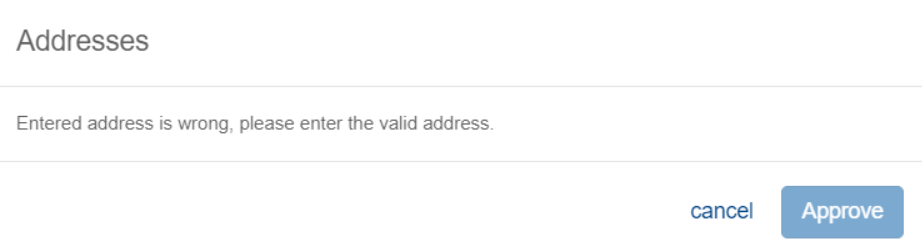
If “Validate” is selected, the system will validate the entered address and will ask for approval if the address is verified.
Click “Approve” to save the new location
Click “Reset” to clear the data
Click “Cancel” to cancel address creation
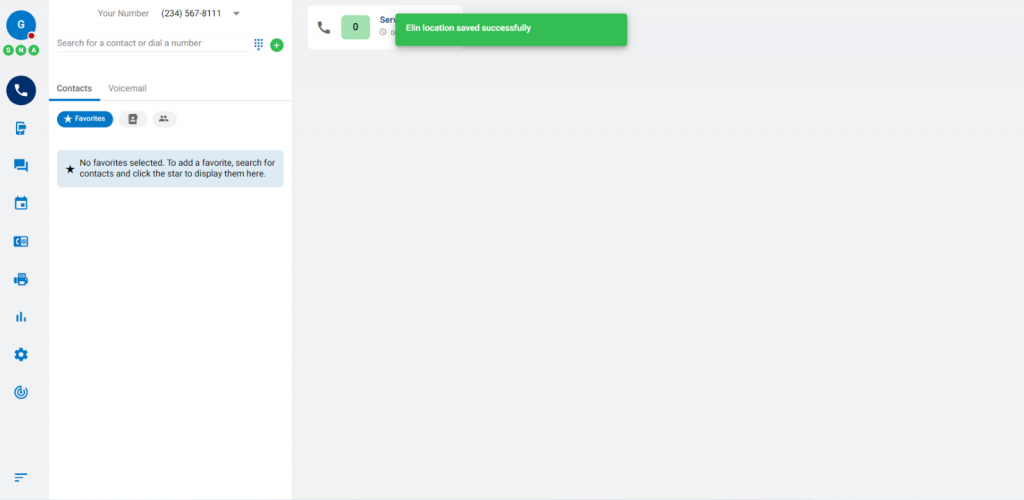
The user will receive the confirmation message: “Elin location saved successfully” once the details are verified
If the entered location is not accepted, the system will show an error message to the user. If an error message is returned, the system will present the error to user and will show the form again with the data populated to allow the user to correct and validate.
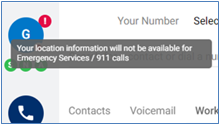
If “Cancel” is selected, the user will be prompted with a warning message: “Your location information will not be available for Emergency Services/911 calls.”
Accordingly, the profile icon will show an error indicating that the location is not mapped.
Emergency Location List
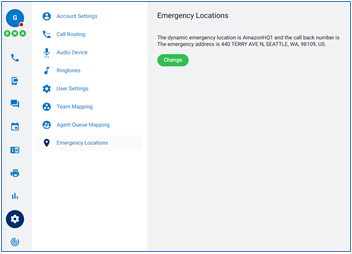
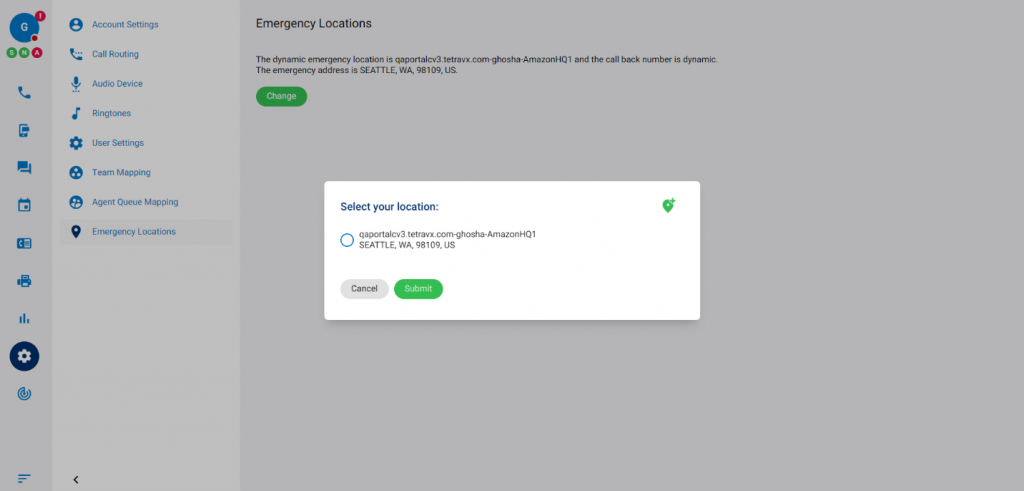
Users can see the list of Emergency Locations on their Settings page. If a device is registered at a corporate-defined network location, the user will only be able to read the location information; they cannot update a corporate-defined location. To change a location, users can choose “Change”; they will be able to see a list of all their personal locations or create a new location.
Users can change locations from their locations list; clicking “Submit” to confirm a location or “Cancel”.
This administrator guide provides an overview of the Enhanced 911 capabilities available through the nVX Cloud PBX. The solution is compliant with the latest FCC guidelines regarding Kari’s Law and RAY BAUM’s Act. See https://www.fcc.gov/mlts-911-requirements for additional FCC Guidelines.
[Please consult with your legal team for proper guidance and your organizations responsibility for compliance regarding the Kari’s Law and RAY BAUM’s Act.]
In summary, Kari’s Law requires any device in the United States to be able to dial “9-1-1” without a prefix or an outside access code. The FCC rules also implement the notification requirement of Kari’s Law, which is intended to facilitate building entry by first responders.
The RAY BAUM’s Act requires first responders to have the necessary information needed to pinpoint the “dispatchable location,” and quickly reach a 9-1-1 caller regardless of the device they dial from, or their exact location inside a large building.
To facilitate the above two mandates, the nVX Cloud PBX helps determine and establish three critical aspects:
a dispatchable location of the 9-1-1 caller
callback number where the Emergency Services operator can call back the caller, and
alert notifications to individuals or teams that can facilitate building access for first responders
The nVX Cloud PBX solution allows administrators to defined network locations using combination of public IPs and private network subnets and associate these “network locations” to physical locations. Each physical location is associated with an Emergency Location Identification Number (ELIN). Additionally, users can define their “dynamic” location from the User Portal. A system managed dynamic E911 DID will be assigned to the user’s dynamic location. The location information and the ELIN/Dynamic DID are provided to the public safety answer point (PSAP), e.g. the 911 operator, when someone dials 9-1-1. Each physical location (group of one or more “network locations”) can also have one or more alert notification contacts mapped. nVX Cloud PBX supports alert mechanisms such as SMS, email, phone call, conference call or triggering a webhook event.
A device or user’s location identification occurs in the following order:
Based on Registration
Network based: System assigns the location based on the network location data (public IP and private subnet) of the endpoint
Dynamic: Location information provided by the user. When a user logs into User Portal from a previously used location, the location will be auto assigned. If they connect from a new location, they will be prompted to enter their location.
Based on Extension level configuration – the admin can hard-code the location at the extension level where the network information may not be static, unique or granular enough.
If location is not identified using above methods, a default location defined at the tenant/domain level will be utilized.
Administrator Configurations
This section contains the configuration items required to enabled Emergency Services for the domain.
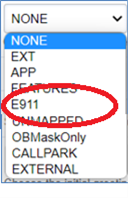
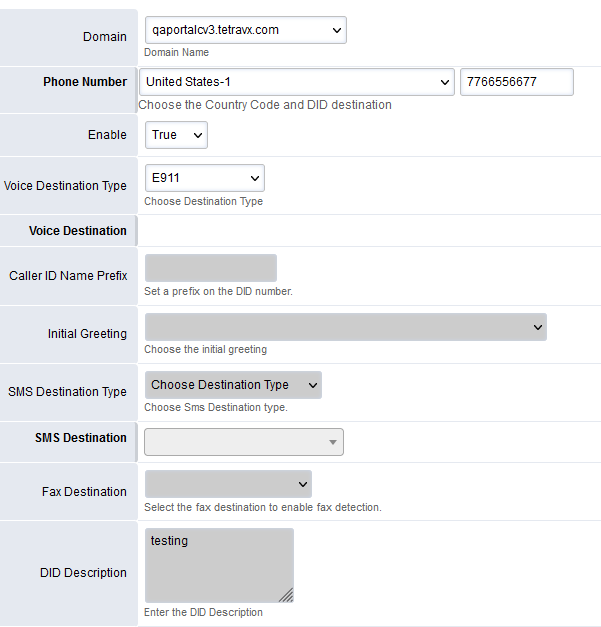
DID Mapping
The DID Mapping section contains DIDs used for Network Based location. The DID must be set to Destination Type E911 to be available as an ELIN in Emergency Service page.
If destination type is selected as E911, all other fields will be grayed out.
Click on ‘Save’ button to save the changes.
Click on ‘Back’ button to go back to the DID list.
Once the DID is mapped to a location, Admin will not be able to change the DID Destination Type.
Emergency Services
Apps à Emergency Services
This section allows admins to create default (first corporate/network location created), other fixed locations as well as dynamic locations on behalf of the users.
Click on ‘+’ icon and fill the following form.
Click on ‘Validate’ button to validate address.
Click on ‘Cancel’ button to cancel location creation.
If the entered address is correct, Admin will receive the confirmation.
If the entered address is not correct, Admin will be asked to enter the correct address.
Once the address is validated i.e. entered address is correct, click on ‘Approve’ button to approve the address.
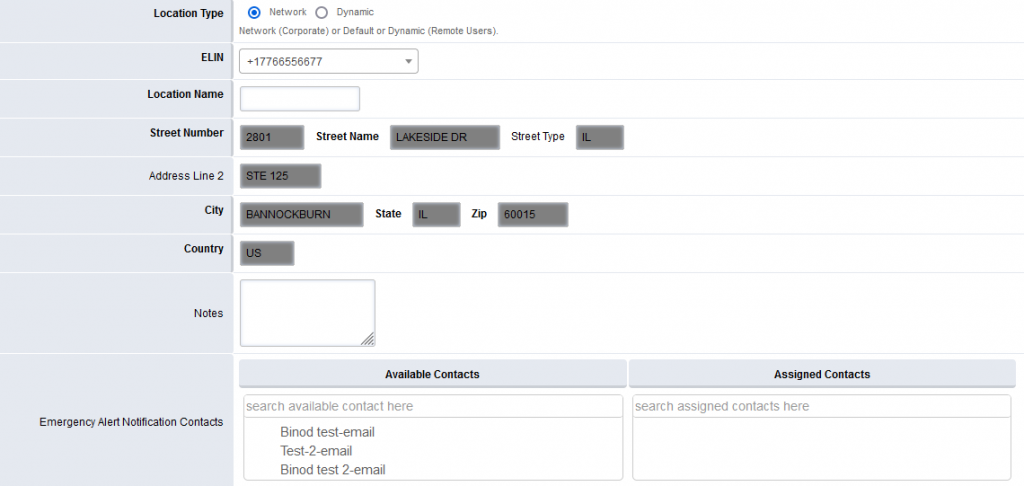
Admin will be redirected to the following form.
Location Type – Select Location type
Network (Corporate) – to create fixed Network Location
Dynamic or Default (Remote Users) – to create Dynamic Location for remote users
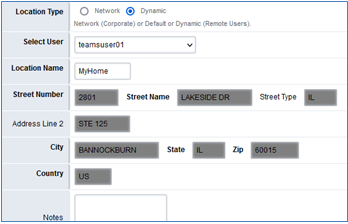
If Network is selected as Location Type,
ELIN – System will show the present list of DIDs that have e911 as DID destination. Search and select Elin from the drop down.
Location Name – Enter Name for Location
Notes – Enter notes if any
Emergency Alert Notification Contacts – Search and select Emergency Alert Notification Contact from the available list.
If Dynamic or Default (Remote Users) is selected as Location Type,
Select User – Select User from the drop down for the dynamic address
Location Name – Enter Name for Location.
Notes – Enter notes if any
Click on ‘Save’ button to save the changes.
Click on ‘Back’ button to go back to the locations list.
Network Locations
Apps à Emergency Services à Click on ‘Network Locations’ button at top right side
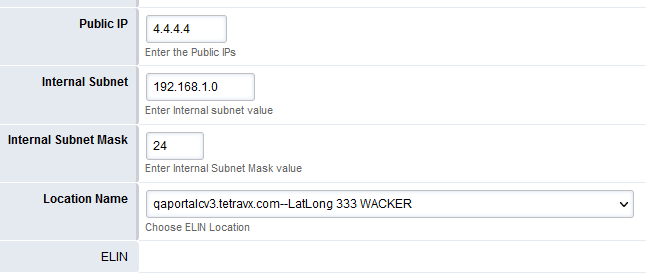
Click on ‘+’ icon and fill the following form to create Network Location.
Public IP – Enter Public IP address of the location
Internet Subnet – Enter subnet
Internet Subnet Mask – Enter subnet mask
Location Name – Select Location name from the drop down
ELIN – once you save, the associated ELIN will show up
Click on ‘Save’ button to save the changes.
Click on ‘Back’ button to go back to the locations list.
Emergency Contacts
Apps à Emergency Services à ‘Emergency Alert Notification Contacts’
This will allow Admins to manage Emergency Contacts for notification.
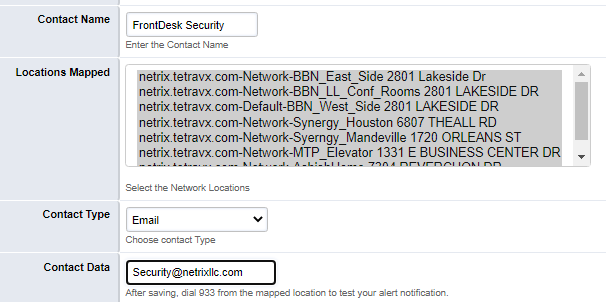
Click on ‘+’ icon and fill the following form.
Contact Name – Enter a Name for Contact
Location Mapped – System will display all Physical Locations available for the domain and allow admins to multi-select the locations.
Contact Type – Select the contact type for Emergency Notification and enter the associated contact data.
Click on ‘Save’ button to save the changes.
After saving, user can dial 933 from the mapped location to test the alert notification.
These contacts will be visible on the Location page and Admin can map multiple contacts to the location.
While on a phone call, click on the blind transfer icon and it will turn green . Once the icon is green, complete one of the following:
Enter a phone number in the search area, then press enter to complete the transfer.
Expand the dial pad and dial a number, click on the number entered, then press enter to complete the transfer.
Expand the Favorites or Contact tab. Search for the user’s name. Hover over the user and click on the extension or mobile number you wish to transfer the call to.
Attended Transfer
While on a phone call, click on the attendant transfer icon and it will turn green . Once the icon is green, complete one of the following:
Enter a phone number in the search area, then press enter to call the transferred party.
Expand the dial pad and dial a number, click on the number entered, then press enter to call the transferred party.
Expand the Favorites or Contact tab. Search for the user’s name. Hover over the user and click on the extension or mobile number you wish to transfer the call to.
Once the called party has been contacted, verify if the transferred party would like to receive the transfer. You will then have 2 choices:
Complete the transfer by clicking on the Complete Transfer icon,
Disconnect the call with the transferred party and go back to the original call by clicking on the Disconnect Attendant icon, .
To conference in other callers to an existing phone call, click on the Conference icon, . The current call participants will hear a tone when other parties join the conference.
Enter a phone number in the search area, then press enter to call the conferenced party.
Expand the dial pad and dial a number, click on the number entered, then press enter to call the conferenced party.
Expand the Favorites or Contact tab. Search for the user’s name. Hover over the user and click on the extension or mobile number you wish to conference in.
Once there are 2 or more parties in the conference, you can do one of the following:
Add more partied to the conference by repeating previous steps using the Conference icon, .
Mute yourself by clicking on the Mute icon, .
Mute participants by clicking on the Mute icon of the party, .
Disconnect a participant by clicking on the Drop Participant icon of the party, .
Remove yourself from the conference call by clicking on the End Call icon, , or the Drop Participant icon on your extension, .
To place a call on hold, press the Hold icon, . To take a call out of hold, press the icon again, .
If multiple calls are on hold, you can toggle between the calls by clicking on the Swap Calls icon, , to bring the calls to the top of the page to then choose the feature to apply.
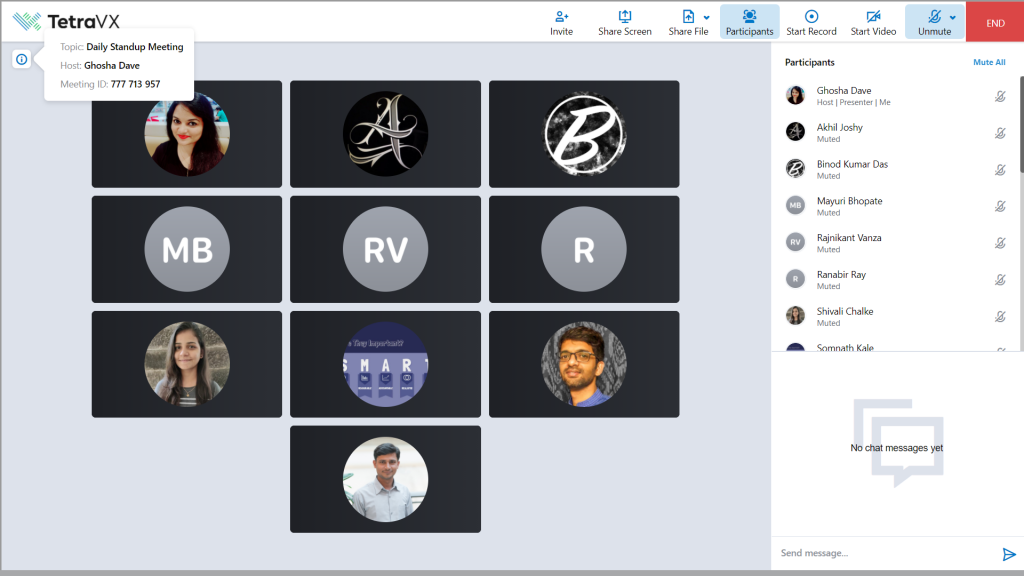
When participating in an nVX video meeting, users will have acces to:
Invite participants
Share screen or application
Share a file
View participants
Record the meeting
Turn on/off video
Mute/unmute
View meeting details
Message with participants
Viewing Meeting Info
To view meeting details, click on the information icon located at the top left of the screen. Meeting details include:
Topic (Meeting Subject)
Host Name
Meeting ID
View Participant List
Select the participants icon shown in the top navigation to open/close the list of meeting participants.
Change Video Layout
Two different video layouts are available:
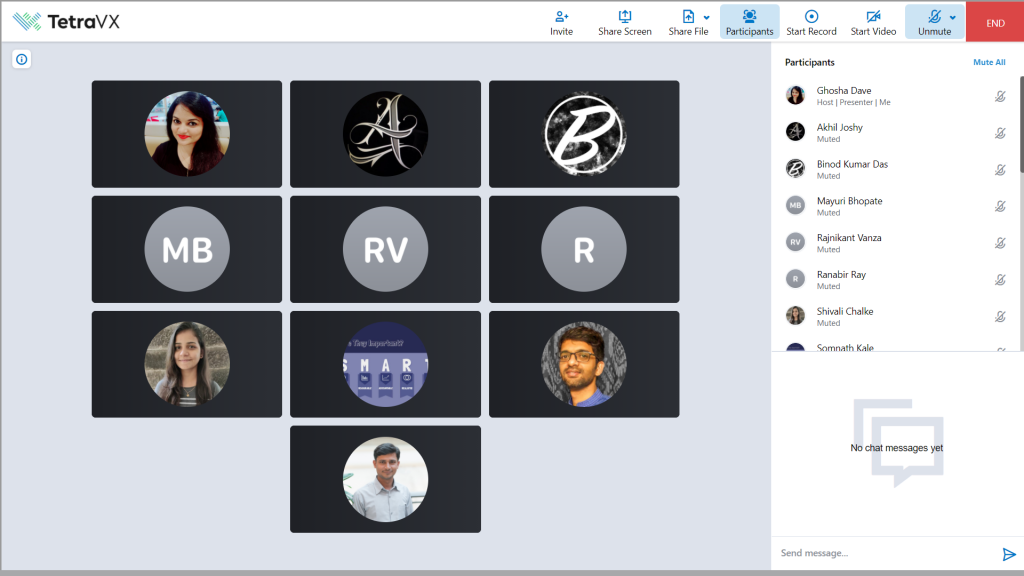
Default View – Gallery view of all video tiles at the middle of the screen
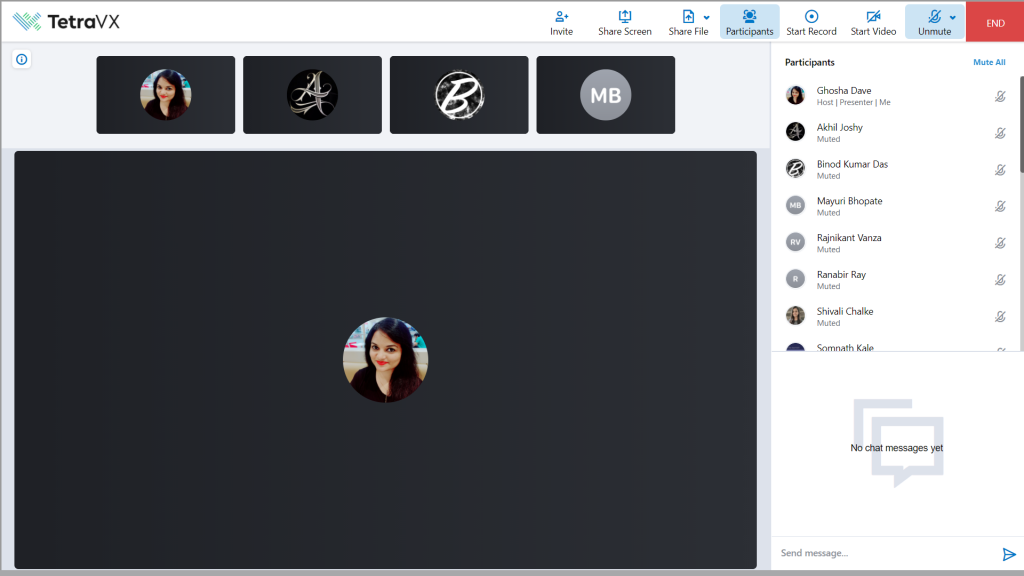
Spotlight View – Single large video tile with remaining tiles located at the top of the screen
To change the video layout, hover over the video tiles towards the middle of the screen. On hover, the layout selections will appear. Please note, the icons will disappear after some time.
Default View
Spotlight View
Note: View selections are disabled while content is being shared.
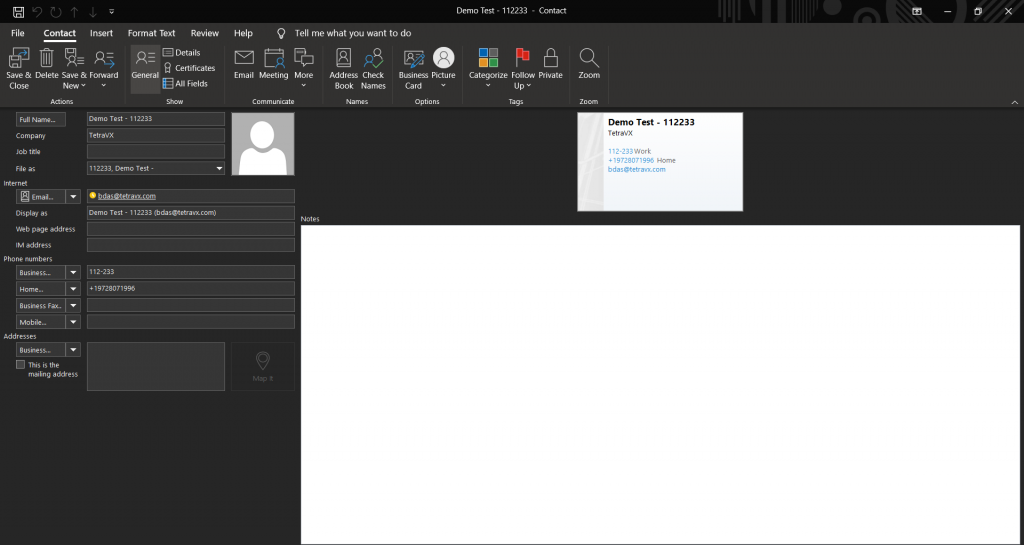
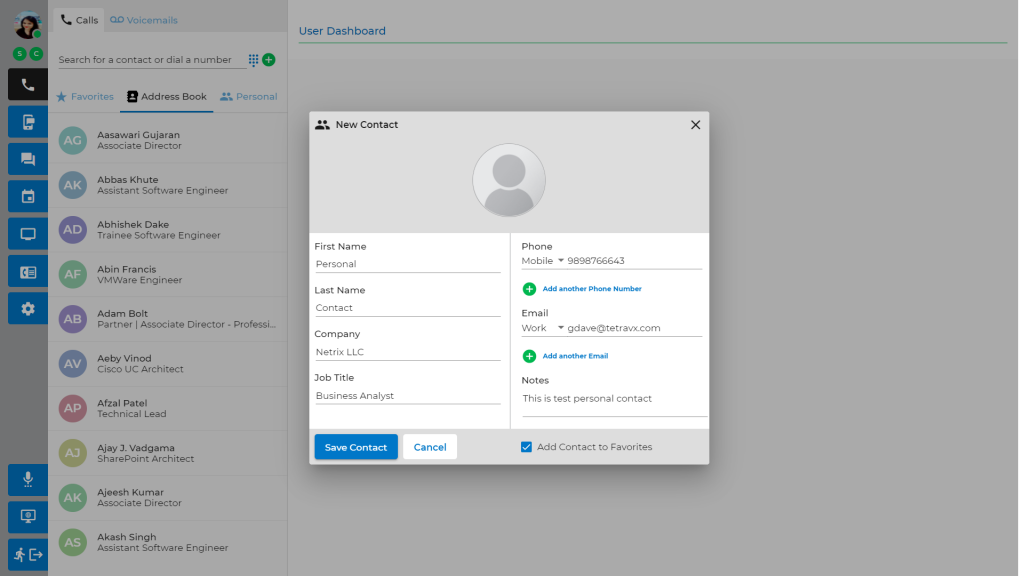
Easily access all Outlook contacts via your nVX user portal. In this article, we will walk you through creating a new contact in Outlook and accessing them through the nVX user portal.
Create an Outlook Contact
Open your Outlook application. Navigate to the Contacts tab and click the ‘New Contact’ button. Complete the required details for the contact and click Save & Close button.
A new contact has now been created in your Outlook directory. This Outlook Contact Directory is synced with nVX, enabling you to see this new Contact under the Contacts tab in the nVX user portal.
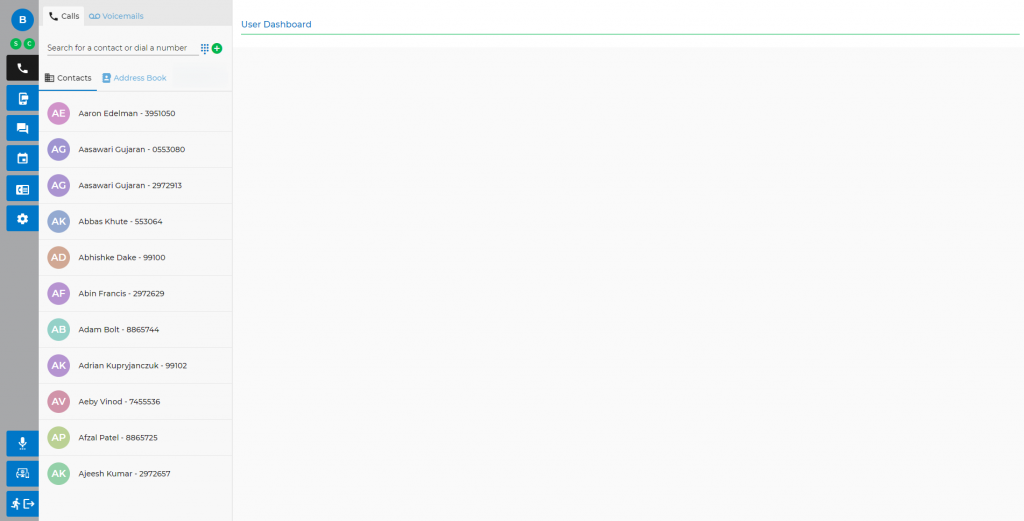
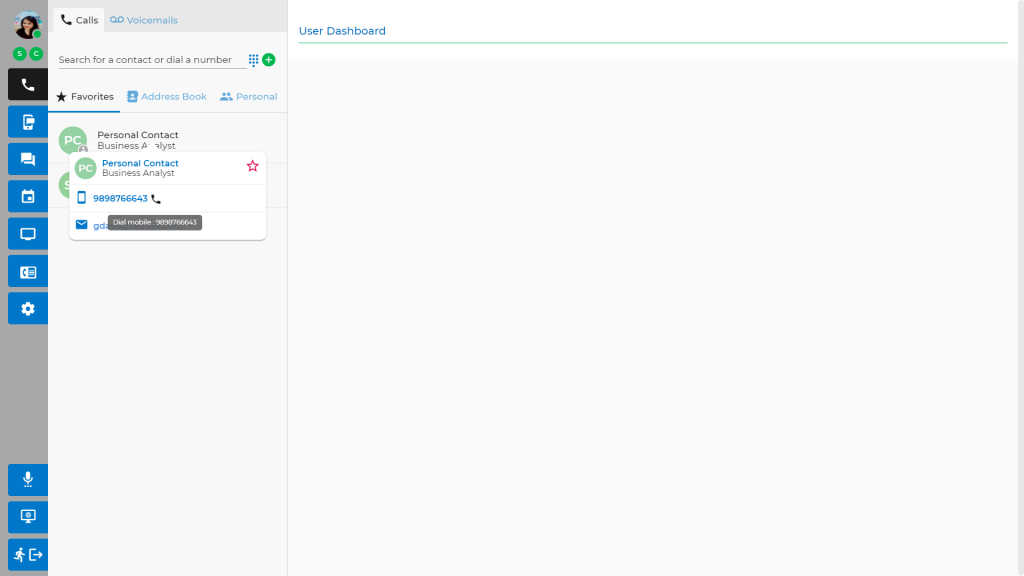
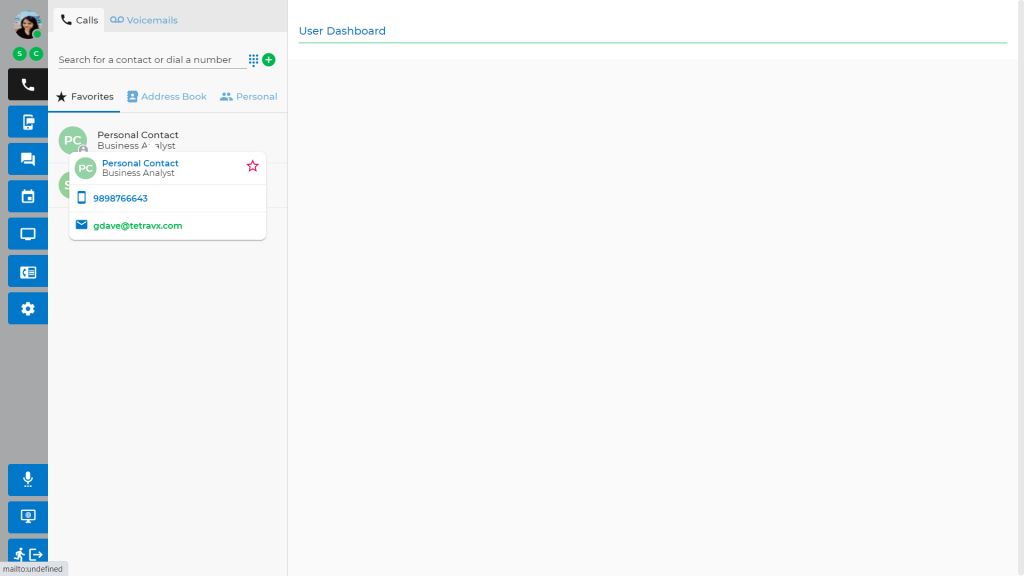
Viewing Outlook Contacts in nVX
Open the nVX user portal. Navigate to the ‘Address Book’ tab to see a full list of Outlook contacts, or use the search bar to find a specific contact.
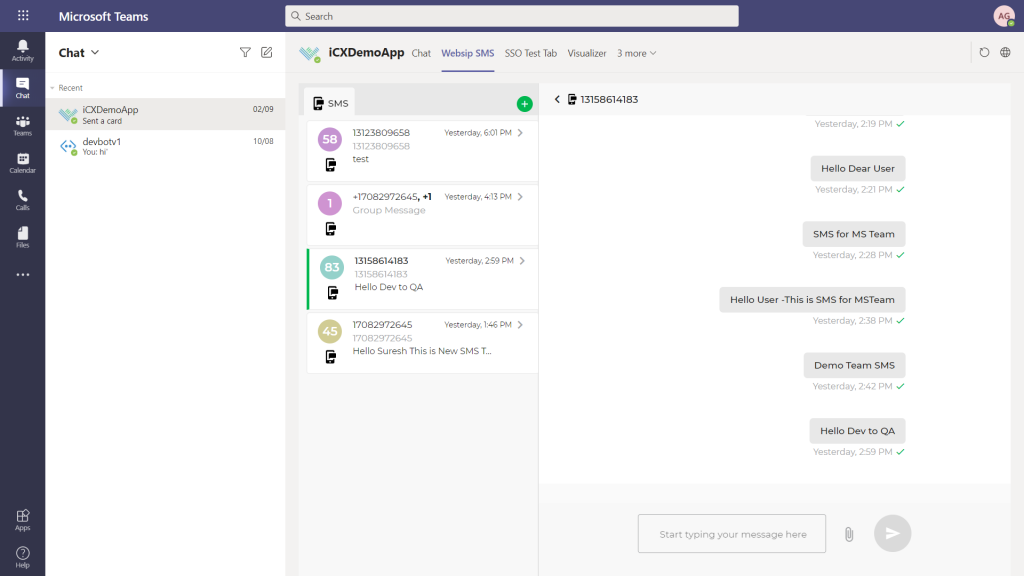
SMS for Microsoft Teams allows Teams users to send and receive SMS and MMS using their Microsoft Teams application.
Note: Not all licensing includes MMS capability. Check with your administrator before sending multimedia messages.
Setting up SMS for Microsoft Teams
Note: Before following these steps, please confirm that your administrator has properly configured your Domain and DID settings.
Step 1
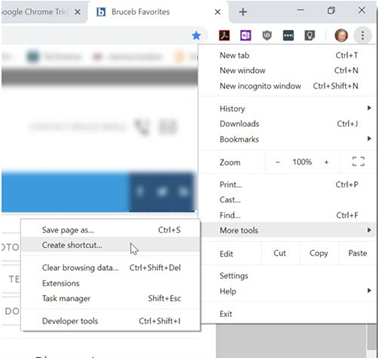
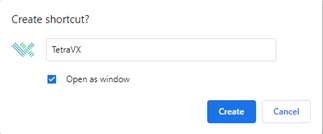
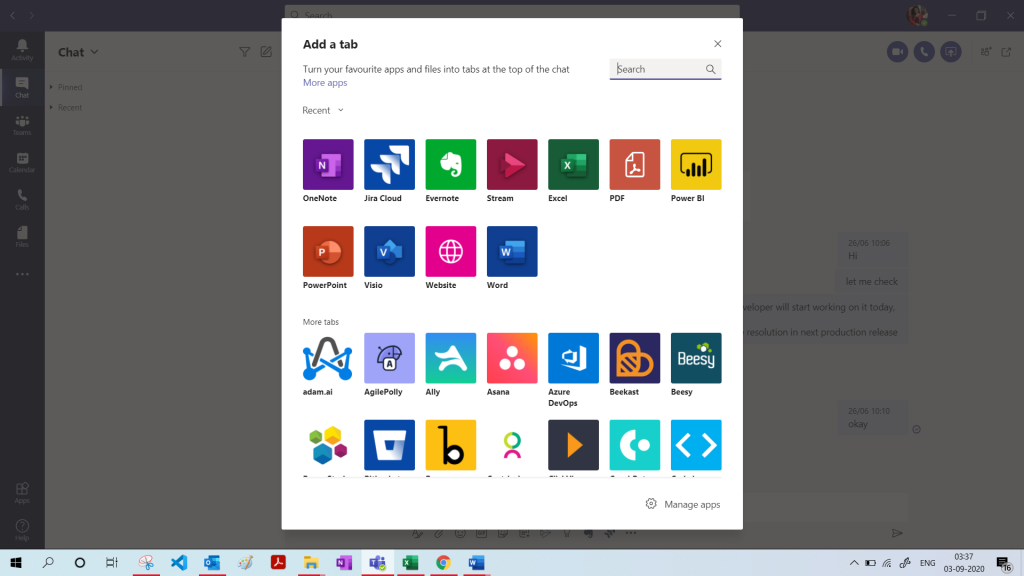
Open the Microsoft Teams Chat tab. Click on the ‘+’ icon within the chat window.
Step 2
Seach for TetraVX and add the new tab.
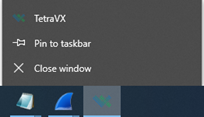
Step 3
Once added, you will see a new tab titled TetraVX in the chat window. By selected TetraVX, you will be able to see SMS conversations. You can now create, send, and receive text messages.
A queue callback is a flow option presented to a caller waiting in a queue. After waiting a specified length of time, the caller can choose to receive a callback from an Agent instead of waiting on the phone. When the callback request is received, based on the configured parameters, an outbound call is placed to the customer.
The Queue Callback feature is very flexible. Managers can choose to activate it and deactivate it simply by following the steps below and the changes will apply in seconds. Thus, they can manually activate it when a call volume or KPI threshold has been reached, during seasonal rushes, on days with expected heavy call volume and when they are short-staffed. This can be an invaluable tool to help keep customers happy and your team efficient during periods of high call volume.
Benefits of Queue Callback
Increase customer satisfaction and retention
Let callers know you value their time by giving them the ability to opt out of your queue and be called back later. Nobody likes a lengthy wait. With this new feature, your customers will no longer have to wait in lengthy queues. Instead, they can wait for an Agent to call them back. Customers will love the company even more when they know that they never have to lose time waiting in a queue.
Decreased caller abandonment
When your callers have the option to request a callback, they will no longer be tempted to hang up and move on forever. Instead, they can request a callback and go about their day while they wait for an agent to return their call.
Never lose a lead
With this new feature, your agents can easily handle every lead that comes their way. As soon as the caller requests a callback, nVX will record their information in their customer profile and y agents can contact the lead as soon as they are free. Agents will never lose a lead again because they were too busy, could not answer their call in time or lost their contact information.
How Callback Works
When a call is made but there are no available Agents, the caller will be sent to a waiting queue. Once in the waiting queue, the first message they hear will be the Queue Callback Message allowing them the option to continue to wait in the queue or request a callback. An example of a callback prompt is: “It appears that all our agents are currently busy. If you wish to receive a call back when the next agent is available, Press 1, or to stay on hold, press any other key.”
How to Configure Queue Callback
To set up Queue Callback:
Login
Create Callback profile
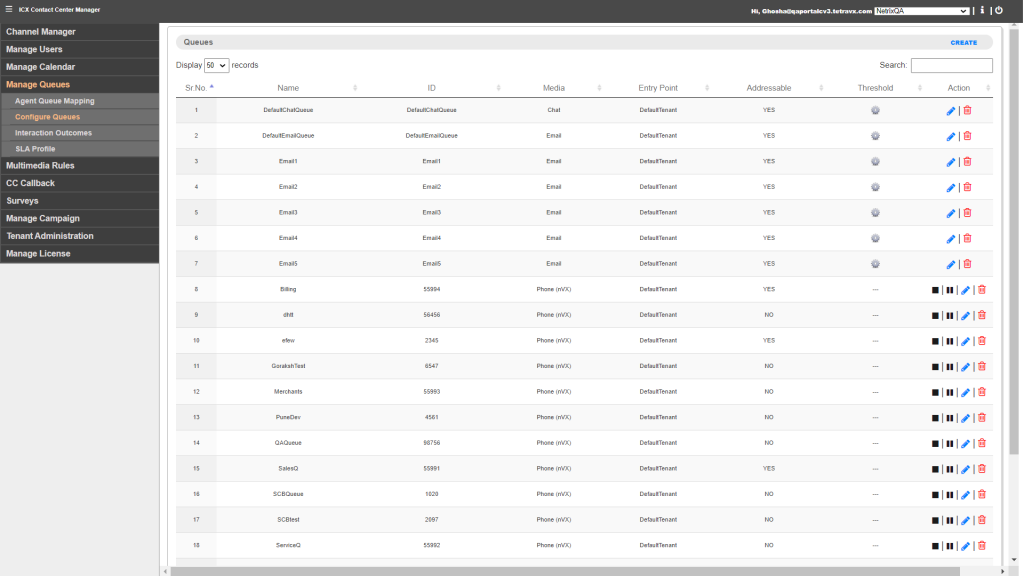
Managed Queues
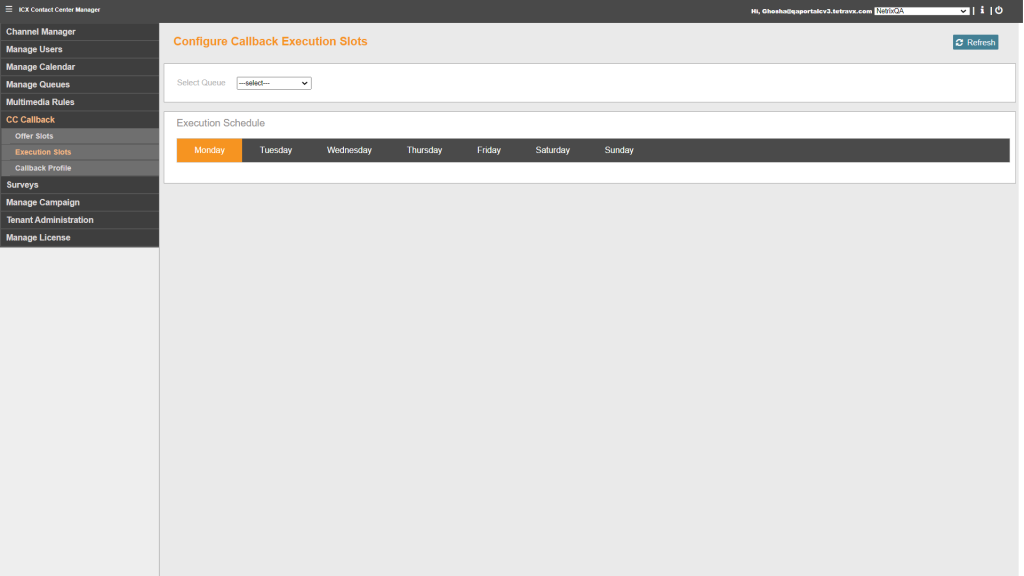
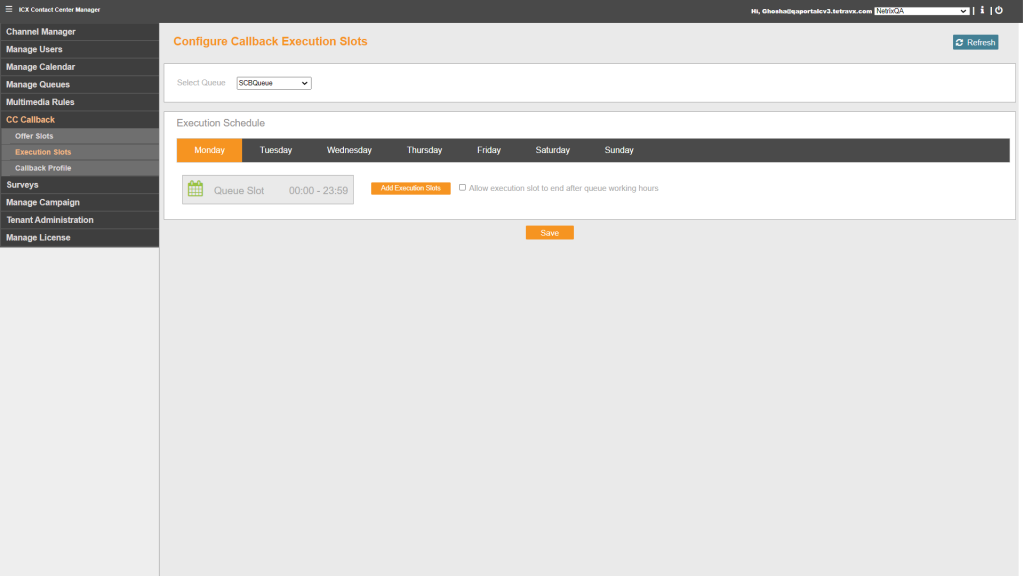
Execution Slots
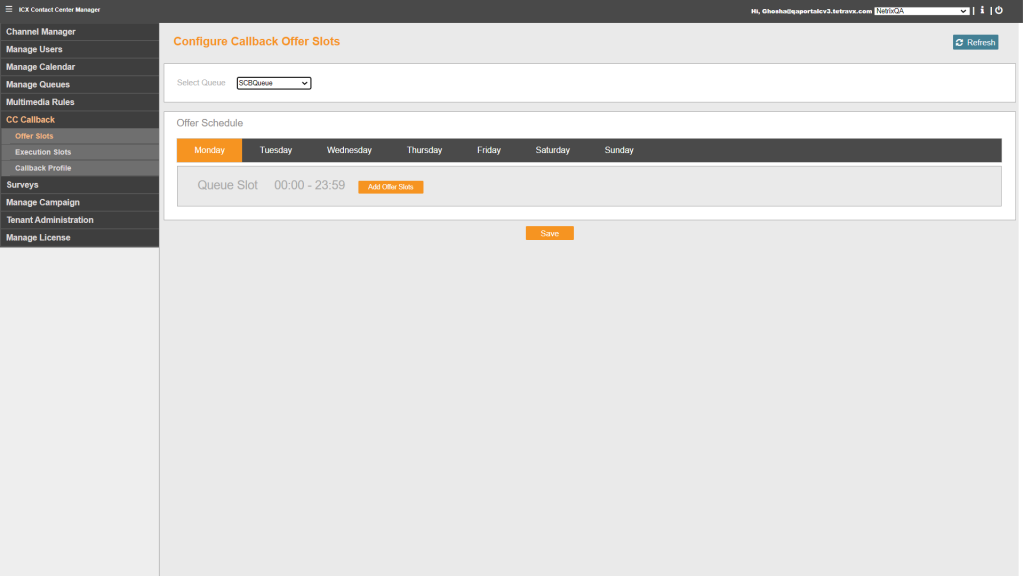
Offered Slots
Login
Login into nVX Admin Portal with the Admin/SuperAdmin credentials. Select Contact Center from the available Apps. Once selected, admins will be redirected to ICX Contact Center Manager.
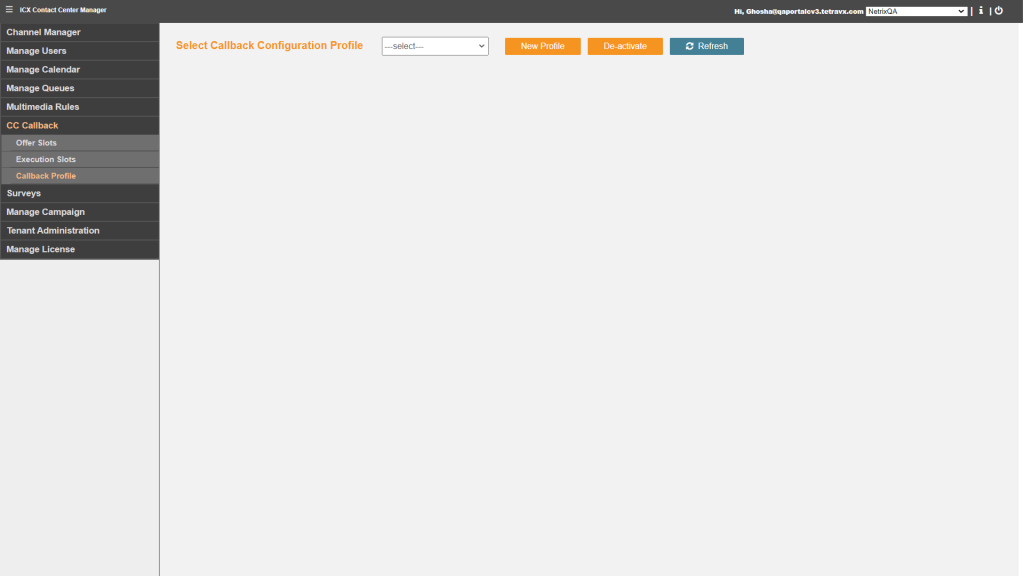
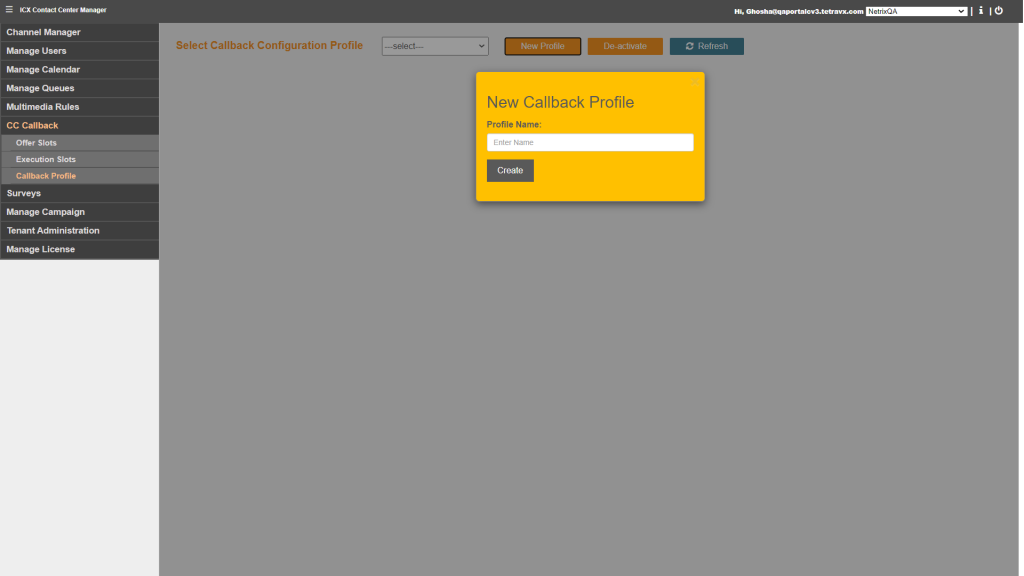
Create Callback Profile
To setup Callback feature, click on. Open Callback profile from CC Callback section.
Admin will have following options:
New Profile – Create new Callback Profile
De-activate -Deactivate Callback profile
Refresh – Refresh UI
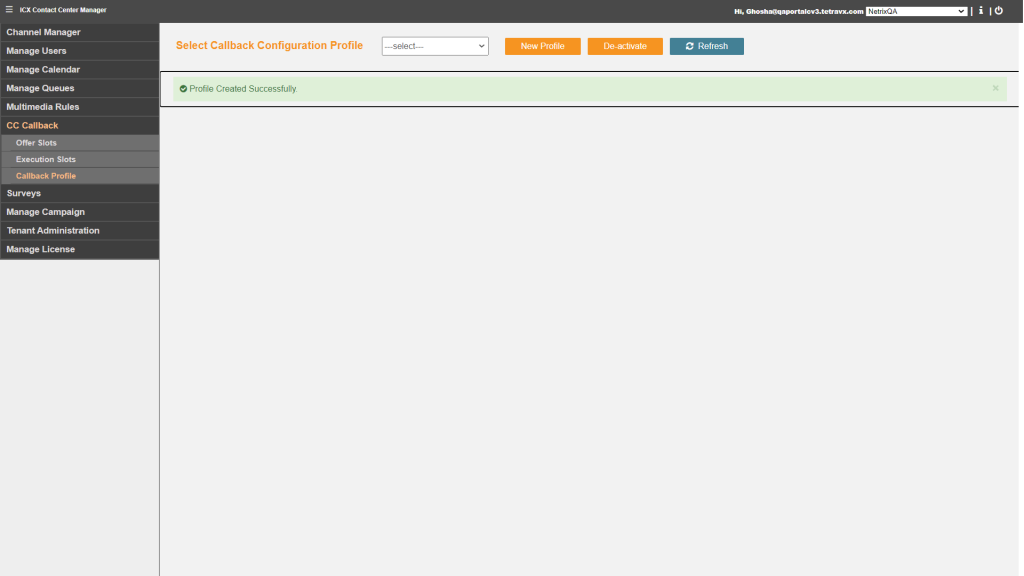
Click on New Profile button, enter Callback profile name and click on Create button.
Once profile is created successfully, UI will show confirmation message – “Profile Created Successfully”
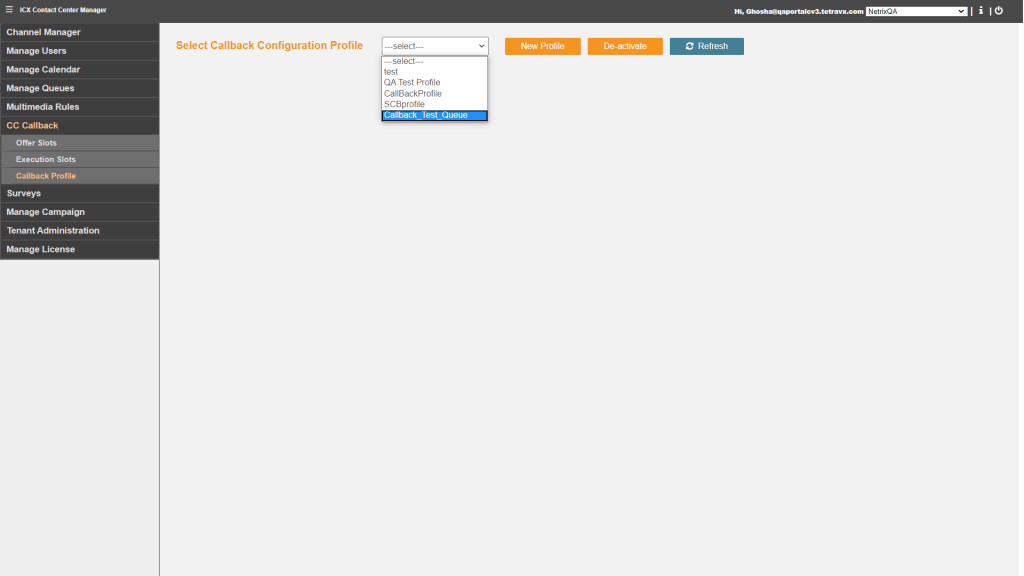
After creating profile successfully, Open the Profile form drop down.
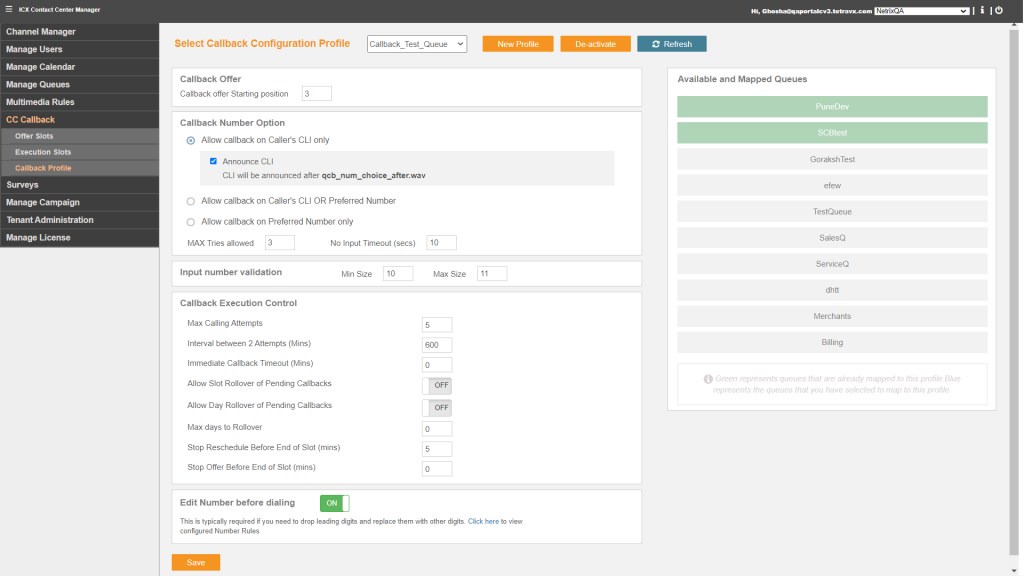
Callback Configuration Profile
After selecting Profile, Callback configuration page will be opened for Queue Callback settings.
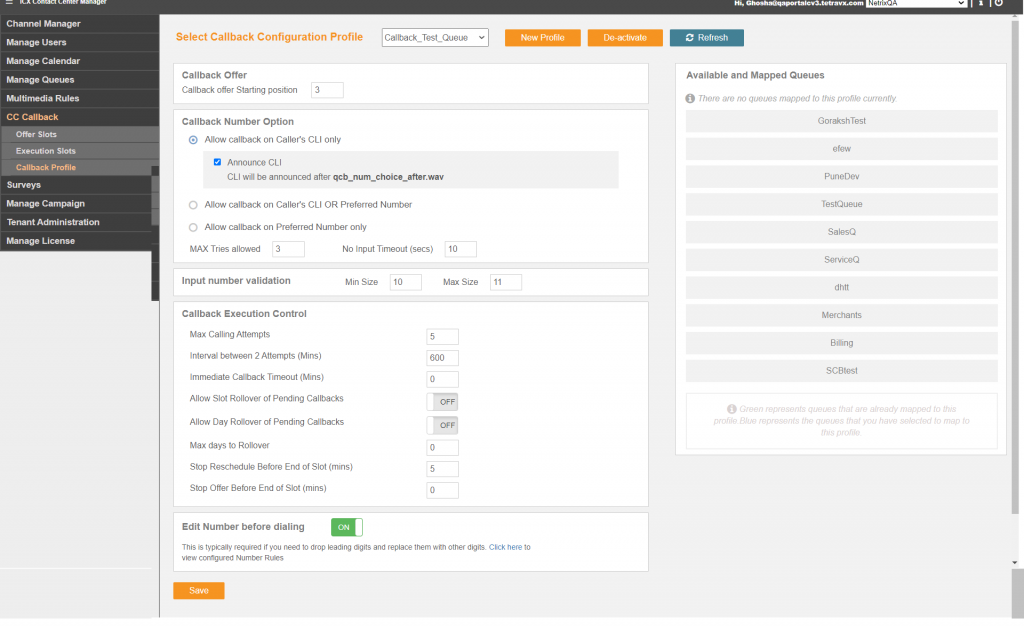
Callback OfferStarting Position
Callback will be offered to only those callers that are waiting in the queue at this position or later.
Callback Number Option
Allow callback on Caller’s CLI only
Announce CLI – CLI will be announce after selected prompt
Allow callback on Caller’s CLI OR Preferred number
Announce CLI after selected prompt
Announce Number entered and ask caller for confirmation – if enabled, system will announce number entered by caller and ask confirmation input.
DTMF 1 is auto assigned as confirmation, so word your announcement accordingly
Allow callback on Preferred number
Announce Number entered and ask caller for confirmation – if enabled, system will announce number entered by caller and ask confirmation input.
DTMF 1 is auto assigned as confirmation, so word your announcement accordingly
Max Ties allowed – max attempts provided to the caller to provide a valid input while requesting a callback
No Input Timeout – amount of time Callback application will wait for the caller to provide a DTMF input
Input Number Validation
Min Size – least number of digits that a preferred callback number must have for it to be considered a valid number in this profile
Max Size – max number of digits that a preferred callback number can have for it to be considered a valid number in this profile
Callback Execution Control
Max Calling Attempts – maximum number of times the callback system will attempt to reach the caller after the first execution. An attempt is counted only when the caller cannot be reached.
Interval between 2 Attempts (Mins) – amount of time interval to maintain between 2 callback attempts
Immediate Callback Timeout (Mins) – if an immediate callback cannot be executed within this time, system will retire the callback
Allow Slot Rollover of Pending Callbacks (ON/OFF)
Allow Day Rollover of Pending Callbacks (ON/OFF)
Max days to Rollover – These are maximum number if days a callback will be rolled over if it cannot be completed
Stop Reschedule Before End of Slot (mins) – Stops scheduling a callback in current execution slot X minutes before the end of slot, where X is the interval configured in minutes
Stop Offer Before End of Slot (mins) – the interval configured here will be the amount if time before the end of an offer slot when the engine will stop offering callbacks if the execution strategy of the slot is Immediate.
Edit Number before dialing(ON/OFF)
This is typically required if you need to drop leading digits and replace them with other digits. Click here to view configured Number Rules.
Available and Mapped Queues
Assign Callback profile to Queue through drag and drop. Mapped Queues will be highlighted.
Offered slot defines the slot in which Callers will be allowed to request callback.
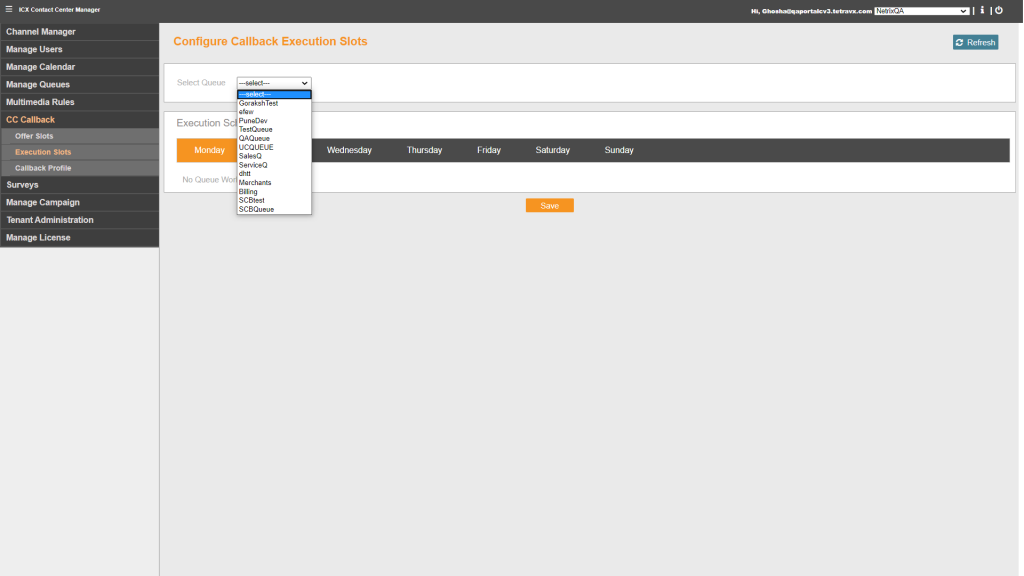
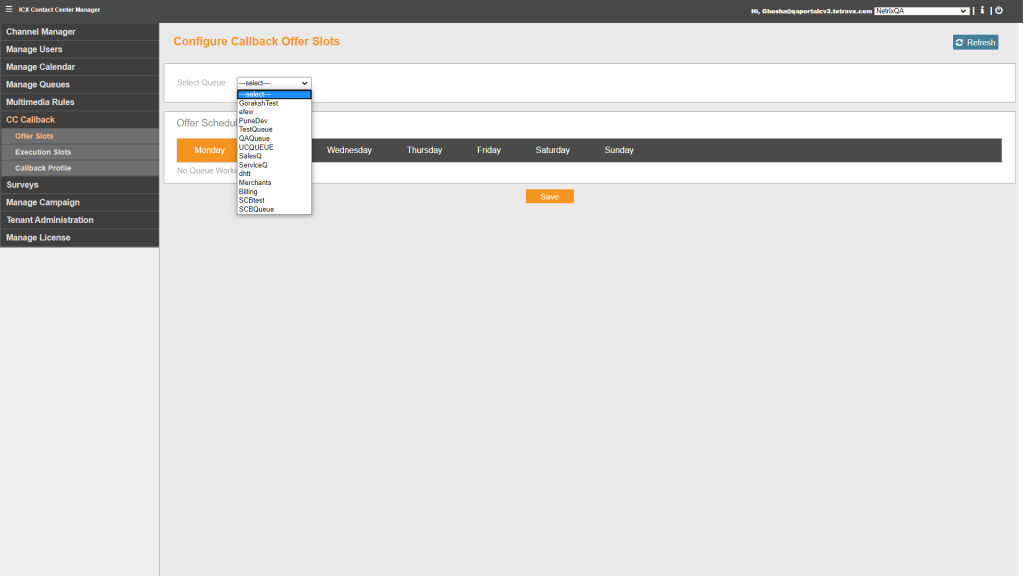
Select Queue from the drop down for which you want to set Callback offered slots.
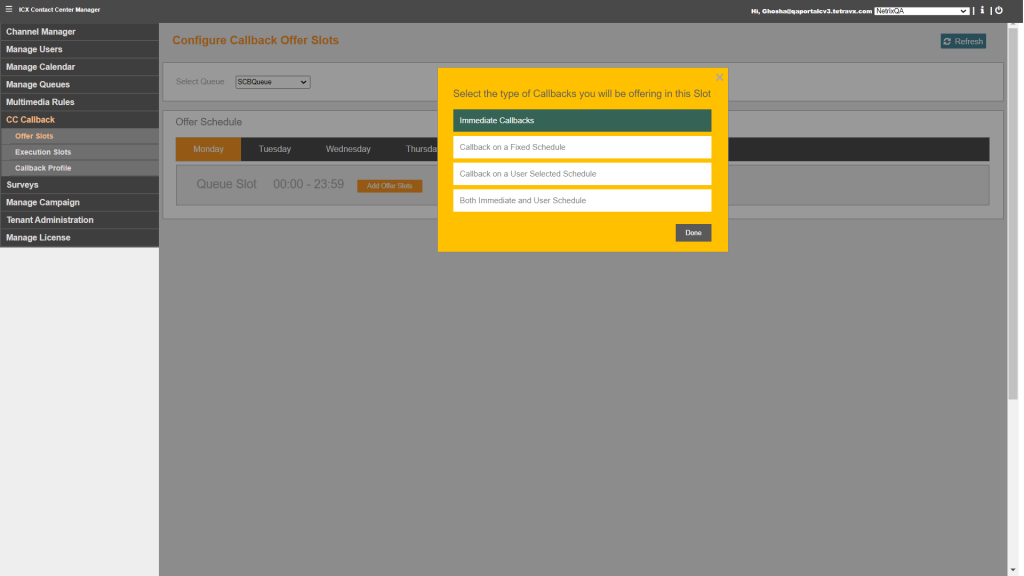
Click on Add Offered Slots button, select type of callback to be offered to caller and set slot. This slot will be allocated to offer the callback service to caller.
Types of Callaback:
Select the type of Callback, which will be offerred in the selected Slot:
Immediate Callbacks
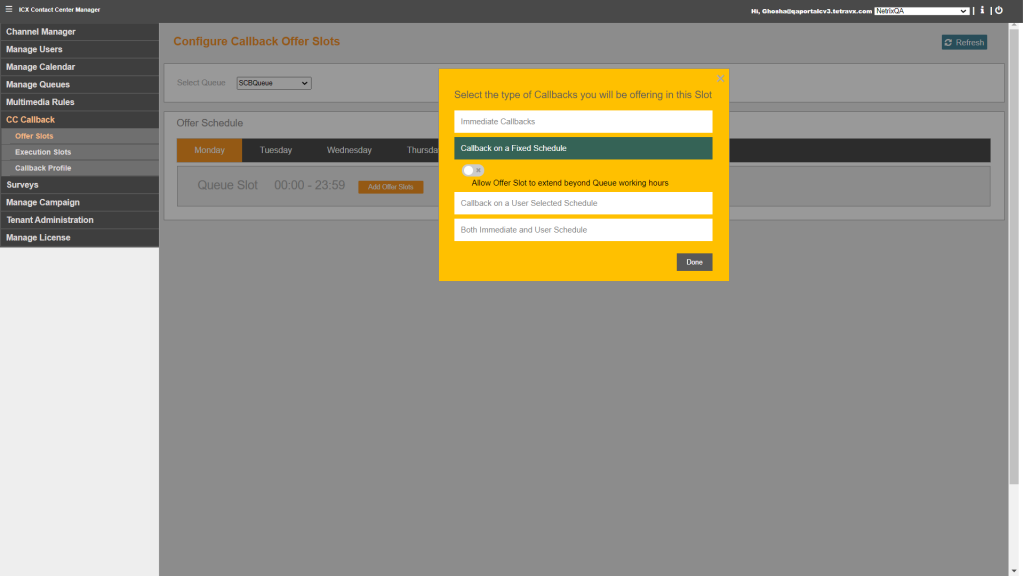
Callback on a Fixed Schedule
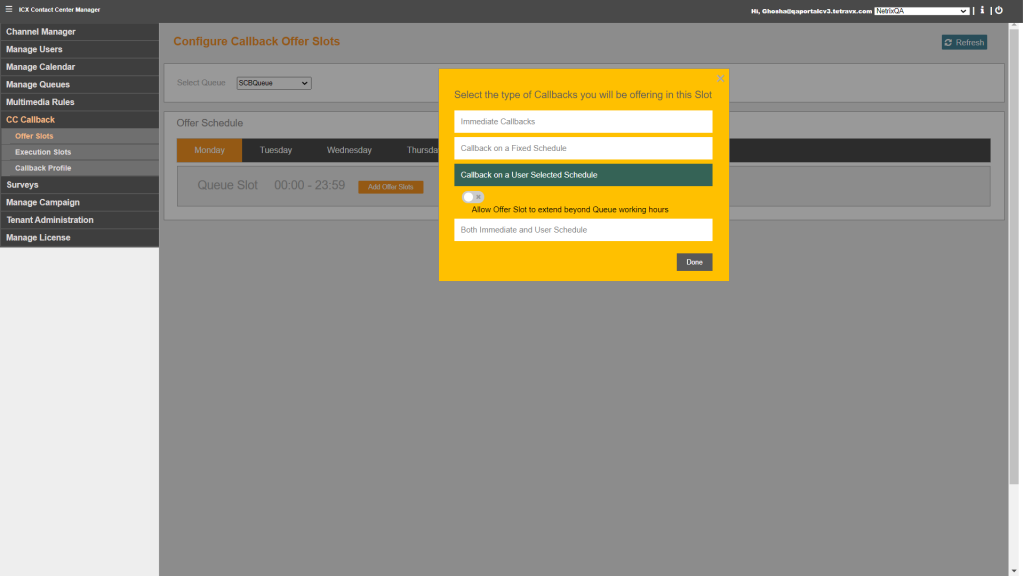
Callback on a User Selected Schedule
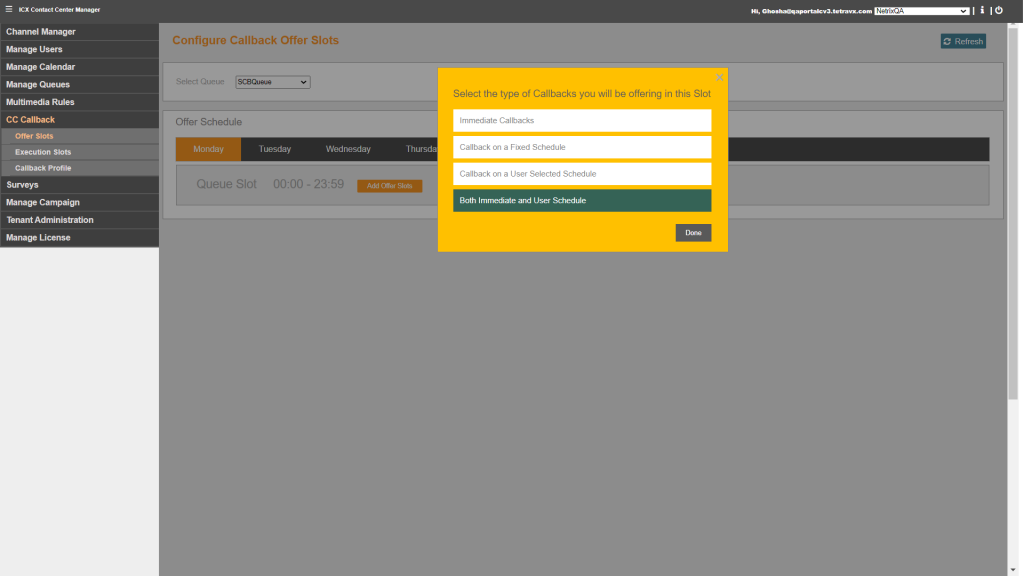
Both Immediate and User Schedule
Immediate Callbacks – Caller will get option to get immidiate callback based on Agent availability.
Callback on a Fixed Schedule – Caller will get option to get callback based on the fixed slot. Allow Offer Slot to extend beyond Queue working hours will provide Callback facility even beyond working hours if enabled.
Callback on a User Selected Schedule – Caller will get get option to get callback based on own time Allow Offer Slot to extend beyond Queue working hours will provide Callback facility even beyond working hours if enabled.
Both Immediate and User Schedule – Caller will get option to get immidiated callback or own avaiable time