nVX Meetings allow users to use all features of TetraVX conferencing solution.
To navigate to the nVX Meetings tool, select the calendar icon from the left navigation panel. Once selected, the user will be redirected to nVX Meeting page. Here, users can perform the following meeting actions:
Scheduling a Meeting allows users to invite participants to a future video or audio conference bridge.
Step 1
Navigate to the Meetings page of nVX by selecting the calendar icon from the left navigation panel.
Step 2
Select the ‘Schedule a Meeting’ button from the nVX Meetings page.
Step 3
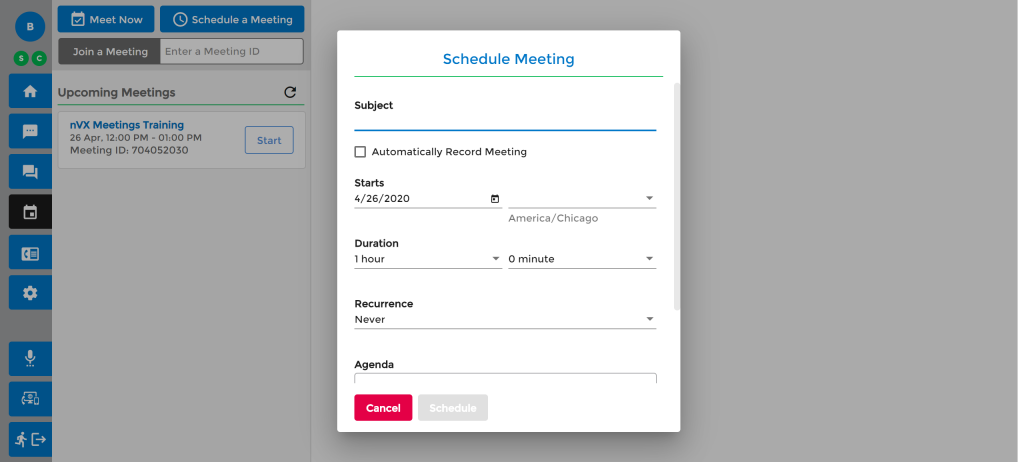
Complete the meeting details to schedule the meeting. Meeting details include:
Subject: Enter meeting subject, this is the meeting title that will appear in your calendar and to guests
Automatically Record Meeting:
If enabled, the meeting recording will start automatically when the meeting begins
If disabled, the meeting will not be recorded
Starts:
Enter the date of the meeting by either typing the date of the meeting or selecting from the calendar view
Select the time the meeting will begin from the dropdown
Duration: Enter duration by selecting the hours and minutes from the available dropdowns
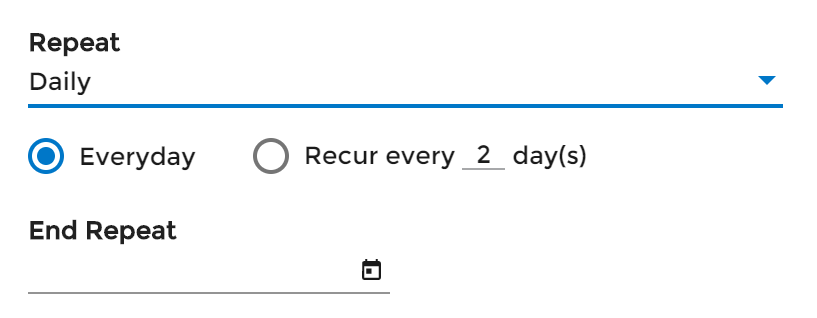
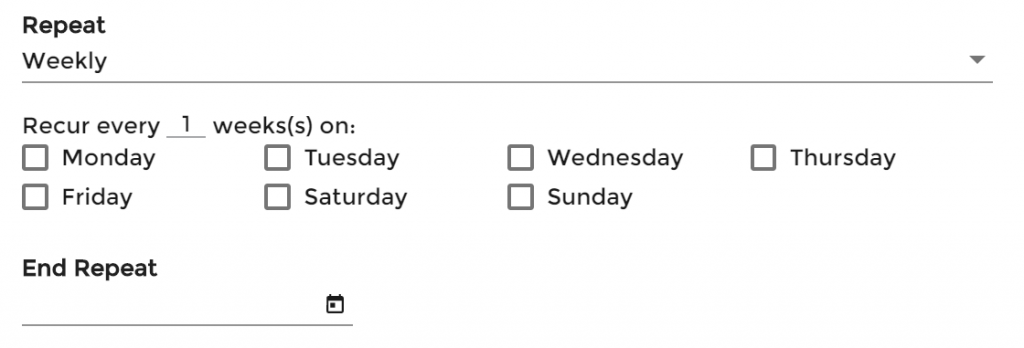
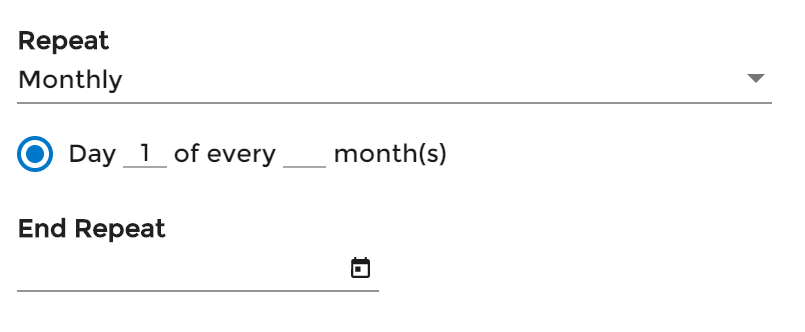
Recurrence: Select how often you want the meeting to occur from the available dropdown. Options include:
Never
Daily:
Everyday: Select Everyday if the meeting is going to be held daily at fixed time and duration.
Recur every_day(s): Enter the number of fixed days between your reocurring meetings. Users will be allowed to enter 1-30 day(s).
End Repeat: Enter the date when the reocuring meetings should end.
Weekly:
Recur every_weeks(s): Enter the number of fixed weeks between your reocurring meetings.
Select the day of the week the reocurring meeting should occur on
End Repeat: Enter the date when the reocuring meetings should end.
Monthly:
Day_of every_month(s): Users can enter 1-30 for which day of each month the meeting should occur on and monthly increments
End Repeat: Enter the date when the reocuring meetings should end.
Agenda: Enter the agenda or description for your meeting. The Agenda field allows you to include meeting details that will be sent to your meeting participants
Invite Contacts: Invite your meeting participants to the scheduled meeting by either typing their name or email address
If adding contacts from your Company Directory, available contacts will populate as you type. Select the contact from the populated list
If adding contacts from outside of your Company Directory, type the email address of the contact you’d like to add and click the Tab key
To remove a contact from your ‘Invite Contacts’ list, select the X , , icon next to the contacts name or email
Step 4
Select the Schedule, , button to schedule the meeting.
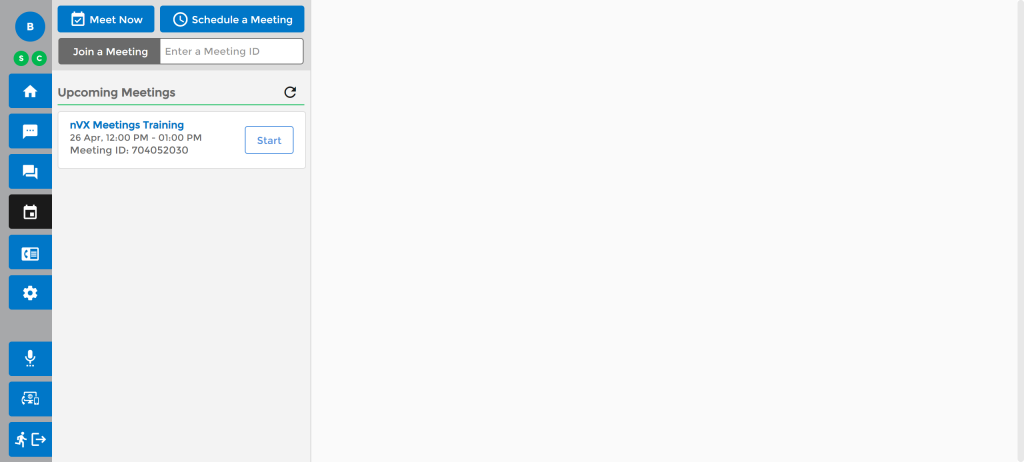
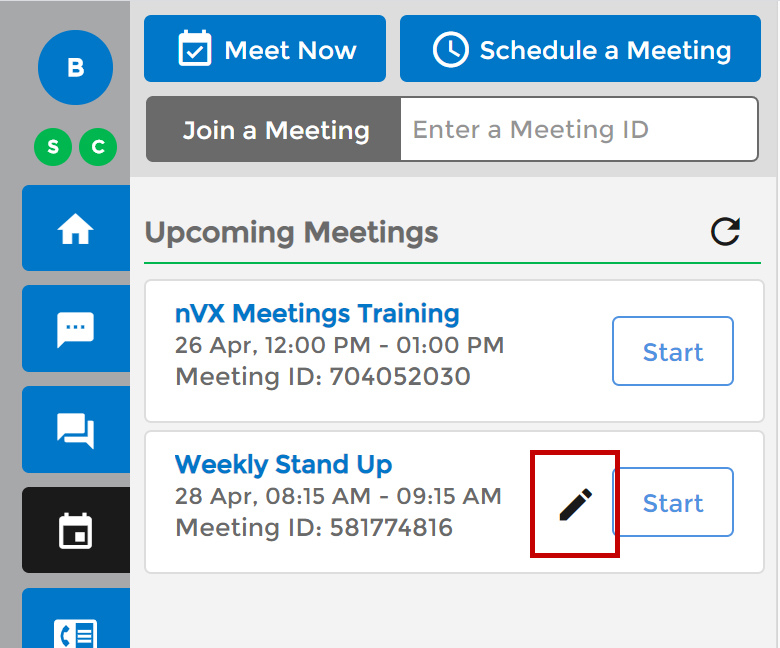
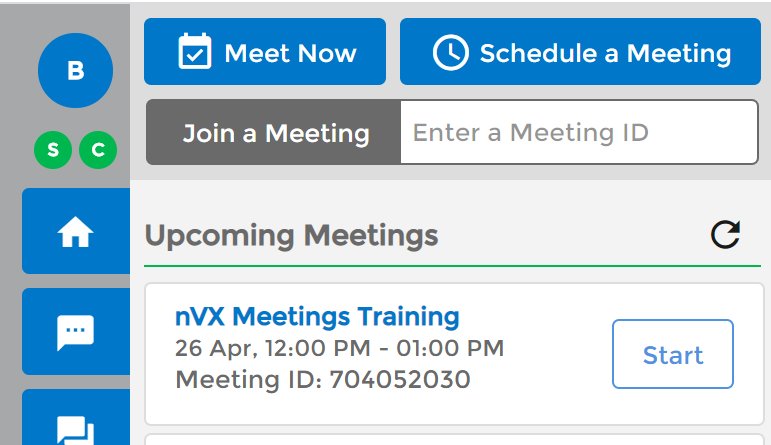
List of Upcoming Meetings
Users can see a list of all upcoming scheduled meetings under the Upcoming Meetings view. Available meetings will include details such as Meeting Subject, Date, Time, Duration, Meeting ID, and a Start or Join button.
Start: If the user is the host of the meeting, a Start button will appear
Join: If the user is a paricipant of the meeting, a Join button will appear
Editing and Deleting Scheduled Meetings
Step 1
To edit or delete a scheduled meeting, hover over the upcoming meeting and select the edit icon from the list of Upcoming Meetings.
Step 2
The meeting details window will open, allowing users to edit the existing meeting information or delete the meeting from occuring.
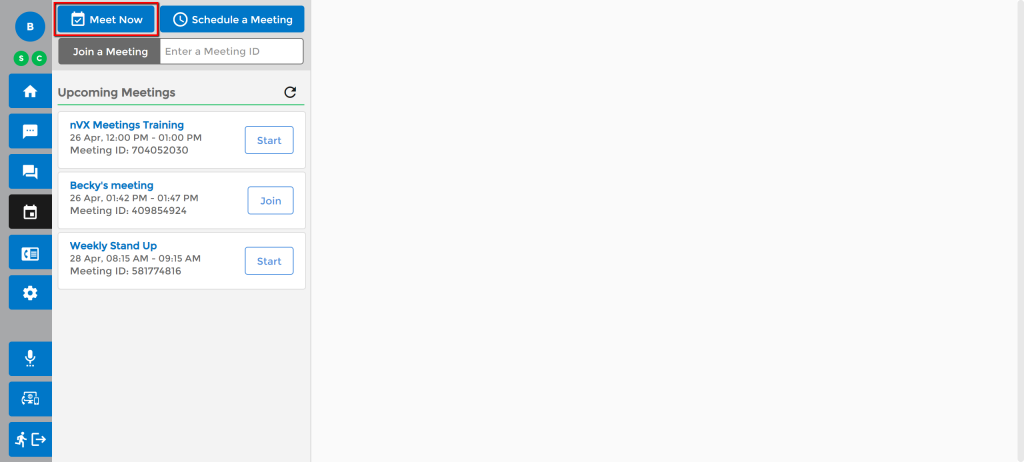
Users can start meetings on-demand for unplanned or ad-hoc meetings. With Meet Now meetings, hosts can start a meeting immediately and invite participants to join via different communication channels.
Step 1
To initiate a Meet Now meeting, navigate to the Meetings page of nVX by selecting the calendar icon, , from the left navigation panel.
Step 2
Click the Meet Now button.
Step 3
Hosts will be redirected to the new webpage where the conference bridge will be opened. Upon opening the conference bridge, the host will be asked to select an audio option:
Phone: Use an external device to dial-in to the conference bridge
If Phone is selected, dial-in incormation including dial-in country name, dial-in phone number, Meeting ID, and participant number will be provided. If multiple countries are available for your organization, the dial-in country can be changed, automatically adjusting the dial-in phone number.
Internet Audio: Use internet audio to connect to the conference bridge
Step 4
To invite participants, click on the Invite button on right top corner of the meeting webpage. Participants can be invited via email, phone, or SMS message. Meeting information can also be copy and pasted into other communication channels.
Copy and Paste Meeting Info
If you would like to share meeting information outside of nVX, you can copy and paste meeting information by selecting the Meet Info button, , at the top of the Invite window. To easily copy meeting information, select the copy button, , from the Meeting Info.
Invite via Email
To invite participants via email, select the Email button, , at the top of the Invite window. Enter the email addresses of Required and Optional participants.
Adding Participants, Company Directory: Start typing the name or email of the participants you would like to invite and the system will suggest the best match from your company directory. Select the contact from the populated list.
Adding Participants, Non Company Directory: If the participant is not available in your company directory, type the complete email address of the desired participated and hit the Tab key.
Removing Email Addresses: Click on red cancel button to remove contacts from the participants list
To trigger the email invite, click the Invite button, , at the bottom of the Invite window to send the email to all participants. User will receive a confirmation popup “Email Invites Successful” to confirm email invitations were sent successfully.
Invite Experience: Invitees will receive an email invitation with the meeting details including meeting date, meeting time, meeting duration, and the URL to join the meeting.
Invite via Phone
To invite participants via phone, select the Phone button, , at the top of the Invite window. Enter the 10-digit phone number or extension of desired participants.
Adding Participants, Company Directory: Start typing the name or extension of the participants you would like to invite and the system will suggest the best match from your company directory. Select the contact from the populated list.
Adding Participants, Non Company Directory: If the participant is not available in your company directory, type the complete phone number of the desired participated and hit the Tab key.
Removing Phone Numbers: Click on red cancel button to remove contacts from the participants list
To trigger the phone invitation, click the Invite button, , at the bottom of the Invite window to trigger a call to invitees. Users will receive a confirmation popup “Phones Invites Successful” to confirm phone invitations were sent successfully.
Invite Experience: Invitees will receive the incoming call with the prompt, “You are invited to the TetraVX meeting, please press 1 to join the meeting”. Invitees will be entered to the meeting after pressing 1.
Invite via SMS
To invite participants via SMS, select the SMS button, , at the top of the Invite window. Enter the 10-digit phone number of each desired participant. Seperate each 10-digit phone number with a comma.
If desired, edit the SMS message that will be sent to the invitees. Click the Invite button, , to trigger the SMS message to invitees. Users will receive a confirmation popup “SMS Invites Successful” to confirm phone invitations were sent successfully.
Note: When editing the SMS message, be sure to keep the invite URL in the SMS message as is. Editing or removing the invite URL will result in errors for invitees.
Participants can join meetings, both scheduled and ad-hoc, from the nVX Meetings page.
Step 1
Navigate to the Meetings page of nVX by selecting the calendar icon, , from the left navigation panel.
Step 2
Join the nVX meeting by:
Selecting Join from the Upcoming Meetings List If joining a scheduled meeting, participants will be able to join from the list of Upcoming Meetings. Simply click the Join button, , from the list of available meetings.
Copy and Pasting the nVX Meeting ID Enter an nVX Meeting ID in the Join a Meeting field. After the Meeting ID has been entered, the Join a Meeting button will highlight blue. Click the button to open the conference bridge in a new tab of your web browser.
Step 3
Meeting participants will be redirected to the new webpage where the conference bridge will be opened. Upon opening the conference bridge, the host will be asked to select an audio option:
Phone: Use an external device to dial-in to the conference bridge
If Phone is selected, dial-in incormation including dial-in country name, dial-in phone number, Meeting ID, and participant number will be provided. If multiple countries are available for your organization, the dial-in country can be changed, automatically adjusting the dial-in phone number.
Internet Audio: Use internet audio to connect to the conference bridge
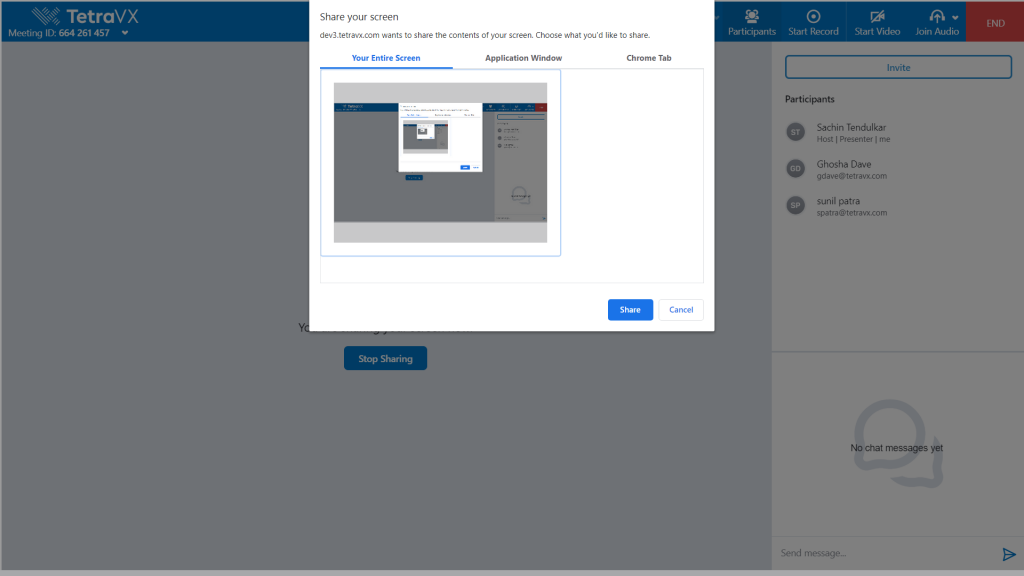
Meeting participants can share and annotate files and whiteboards while in meetings.
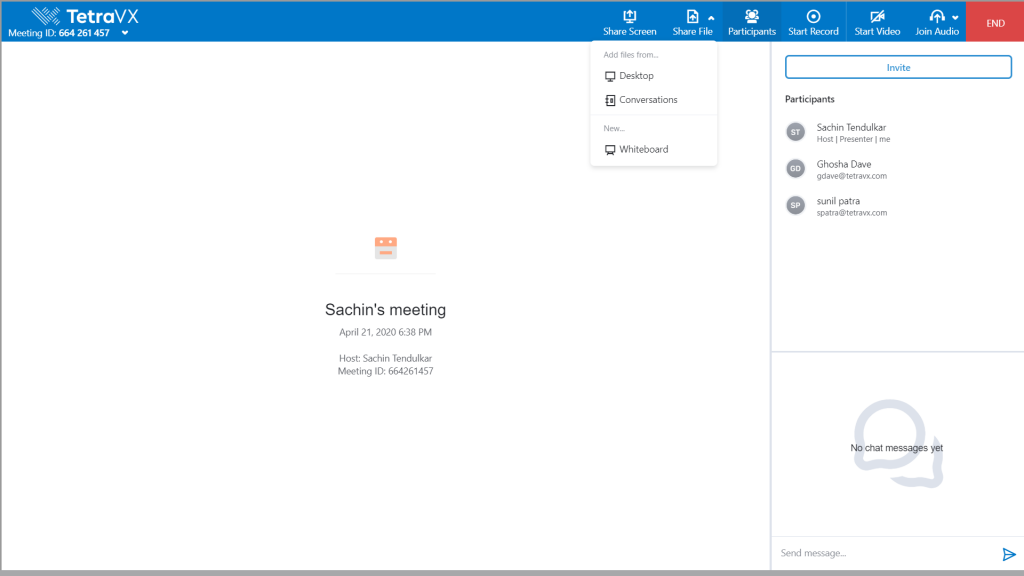
Sharing Files
Participants can share Files directly within a meeting by clicking the Share File icon on the top of the meetings window. Select from the following:
Add files from Desktop: Select files stored locally on the desktop
Add files from Conversations: Select files stored in existing nVX messages
Creating Whiteboards
Participants can create whiteboards directly within a meeting by clicking the Share File icon on the top of the meetings window. Select Whiteboard from the dropdown. A new Whiteboard will be opened.
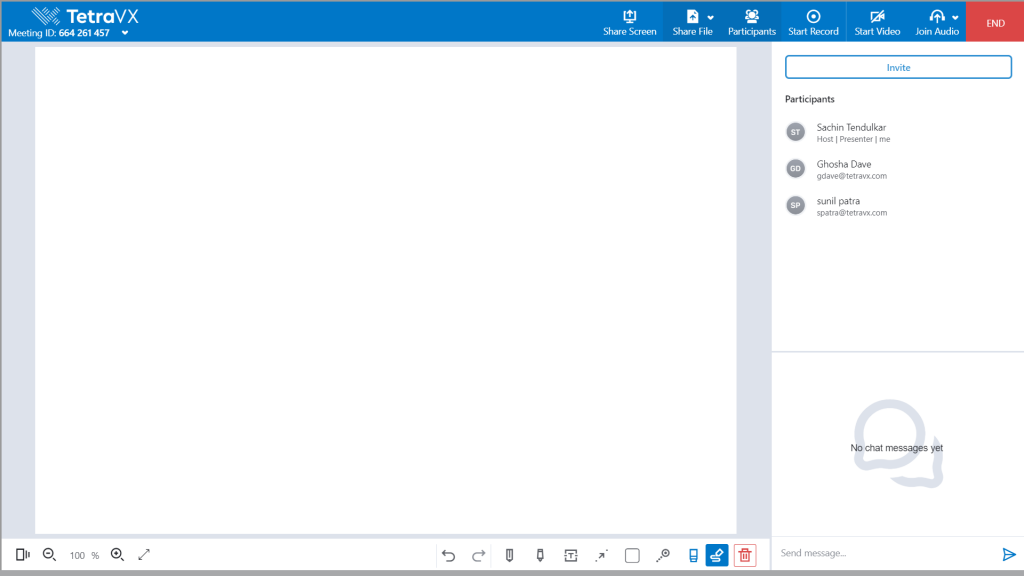
Annotating Files and Whiteboards
Participants can simultaneously annotate shared Files and Whiteboards using a variety of tools. All annotation tools are available from the bottom of the meetings window.
Navigate through shared Files and Whiteboards
Zoom In and Zoom Out
Make Files and Whiteboards Fullscreen
Undo Action
Redo Action
Draw
Highlight
Insert Text
Insert Arrows
Insert Rectangles
Identify specific areas of a File or Whiteboard using the laser pointer
Eraser (Note, participants cannot erase other participants annotations. Only their own.)
Turn on and off Annotation
Delete (Note, participants cannot delete other participants Files or Whiteboards. Only their own.)
Open color selector for annotations
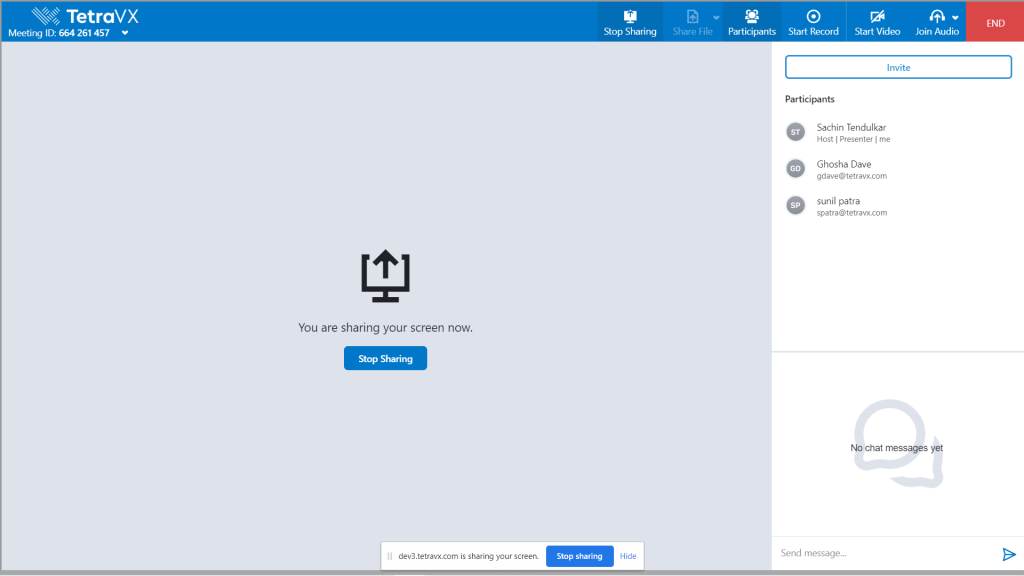
Stop Sharing Files and Whiteboards
You can stop sharing Files and Whiteboards by:
Selecting the Share File icon and clicking Stop Sharing, , from the dropdown
Hovering over the File or Whiteboard being presented and selecting Stop Sharing
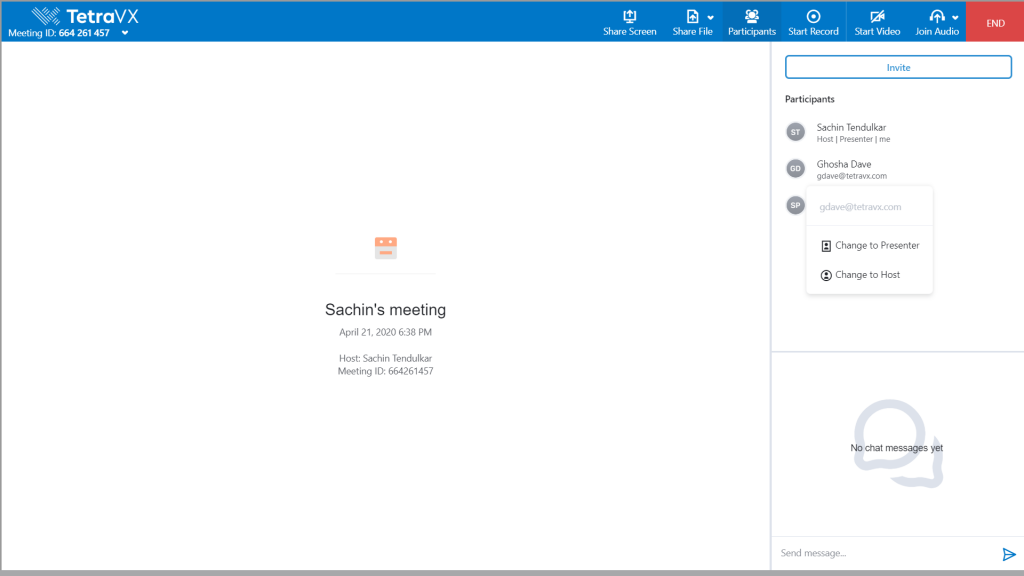
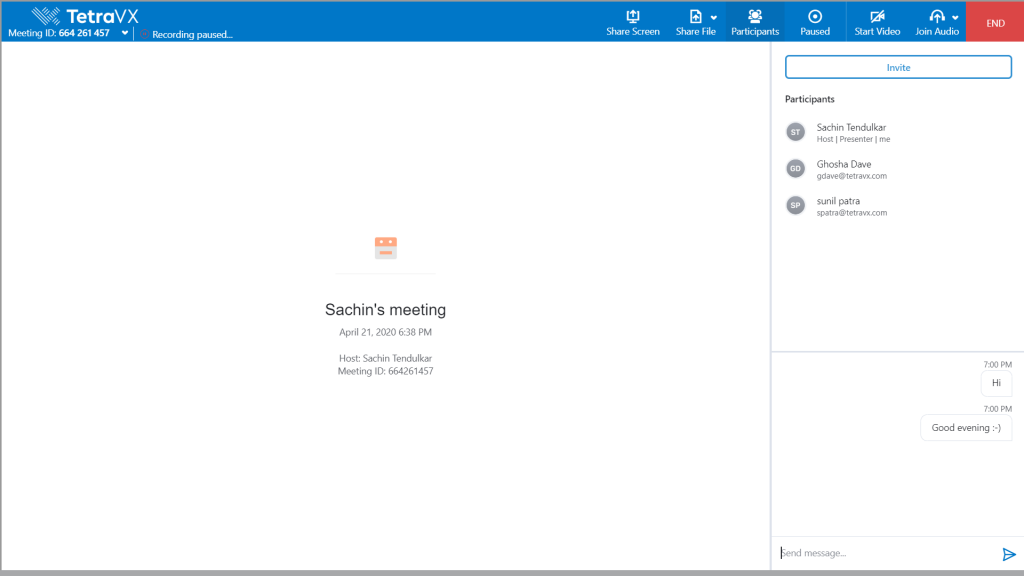
All meeting participants can group chat in the same meeting. To open the group chat, selec the Participants icon at the top of the Meetings window. Group chat will be available on the bottom right of the screen. Participants can type into the text box marked by the placeholder ‘Send message..’. So send the message, press the Send icon, .
All Meetings are video enabled. To turn on Video, select the Start Video icon on the top right of the Meetings window.
To manage the device capturing video, select the dropdown arrow next to the Stop Video icon and select Video Options. Available devices will appear in the Capture Video dropdown. After selecting the desired device, click Okay.
To stop video capture during a meeting, click the Stop Video icon located at the top right of the Meetings window.
Meeting participants will be prompted with Join Audio options upon Joining a Meeting. However, participants can manage meeting Audio at anytime.
Joining Audio
To join audio after a meeting has begun, select the Join Audio icon from the top right of the Meetings window to open the dropdown selections.
Call Using Phone: Use an external device to dial-in to the conference bridge
If Phone is selected, dial-in incormation including dial-in country name, dial-in phone number, Meeting ID, and participant number will be provided. If multiple countries are available for your organization, the dial-in country can be changed, automatically adjusting the dial-in phone number.
Call Using Internet Audio: Use internet audio to connect to the conference bridge
Mute and Unmute Audio
After meeting audio has been joined, a Mute icon will be made available where the previous Join Audio icon was. To mute and unmute audio, click the Mute icon.
Manage Audio Options
Click the dropdown arrow next to the Mute/Unmute icon. From the dropdown, select Audio Options. An Audio Options window will appear. Select from the available Speakers and Microphones. This window will also provide a level test that audio is being captured correctly. After selecting the desired devices, click the X icon to exit the Audio Options window.
Leave Audio Mid-Meeting
Click the dropdown arrow next to the Mute/Unmute icon. From the dropdown, select Leave Audio.